The age old battle between physical and digital filter stirs once more. It’s difficult to pick a winner because both are integral to the entire photographic process, and, individually, each has its advantages for different effects that you’re trying to achieve.
Some view the physical filter as an unnecessary piece of baggage, needlessly weighing down your kit, as you can replicate its effects in post-production software.
As your photography expertise grows, you’ll learn for yourself when it’s appropriate to use a physical filter and when it’s preferable to use software-generated filters. So what I really want to investigate is: What advantages do each have?
When a Filter Will Achieve the Desired Result
For any shoot, we go to great lengths to get the lighting right or wait for hours, tripod at the ready, to capture the perfect shot because we know that detail that isn’t captured there and then cannot be restored afterwards.
So why should we compromise more of our time to wait for better lighting when a filter can do the trick? Both physical filters and digital filters can achieve the desired result, but which one is best for different creative intentions?
Best Filter for Details – A Polarizer
A polarizer is great for capturing intimate detail in a landscape setting. Through darkening the sky and reducing glare, you’re able to dramatically increase the amount of detail in the image, so you’re ultimately enhancing the recording power of your camera.
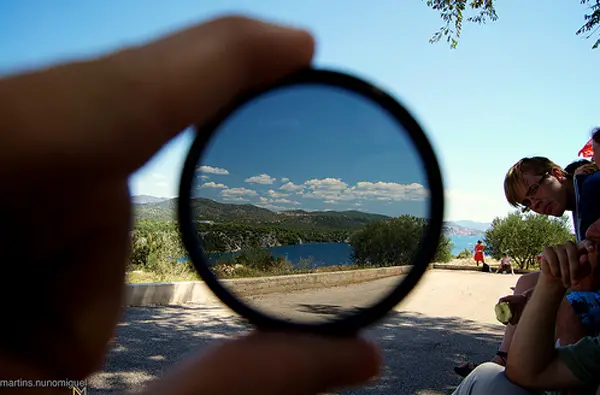
A Polarizer filter is unrivaled in its ability to increase actual contrast in daylight exterior settings; the picture above depicts exactly what it can do. Imagine your camera is wearing sunglasses: All polarized light is filtered out, leaving a richly saturated picture. Let’s have a look at a physical circular polarizer filter.
Physical Polarizer

The colors in the photo are unmistakably saturated –the sky is a robust blue and the sunflowers look highly imbued with golds and oranges. Although one not familiar with photographic techniques could argue that this has been “photoshopped,” the natural graduation of tonality in the sky is something that a physical filter can capture instantly, but digital manipulation may help to define certain areas.
Digital Polarizer
This is a great example of a saturated photo taken when day light was receding; however, it is obvious that the effects have been achieved in post production, as the detail does look somewhat disturbed and inwardly encroaching in a vignette style. In this instance, because a physical polarizer hasn’t been used, it’s increased the amount of post production needed to achieve the desired result.
Still, this is a great technique to add mood and open the channels of interpretation to your shots.
Graduated ND Filters
Graduated ND filters, simply known as grads, offer photographers the option to control that ugly flare up of light in frames. They’re designed to maintain detail in areas that would otherwise be blown out if natural lighting in the sky wasn’t controlled. Let’s take a look at what a graduated filter acts and looks like:

As you can see from this picture, graduated filters are clear on the bottom with slight opacity at the top and dependent on which strength of lens you’ve chosen. They’ll either be an abrupt or gradual transition in the middle.
This filter is ideal for landscape photography, as you can place the middle over the horizon, leaving the darker area to cover the lightest part of your image (the sky) and the lighter part to allow light to pass through normally. This will allow you to control and define detail in the sky.
Available in different stops, the one-stop filter will darken the bright area by a factor of two, the two-stop by a factor of four and the three-stop by a factor of eight. You can also buy these filters with different transitions, so let’s take a look at a picture taken with the one-stop.
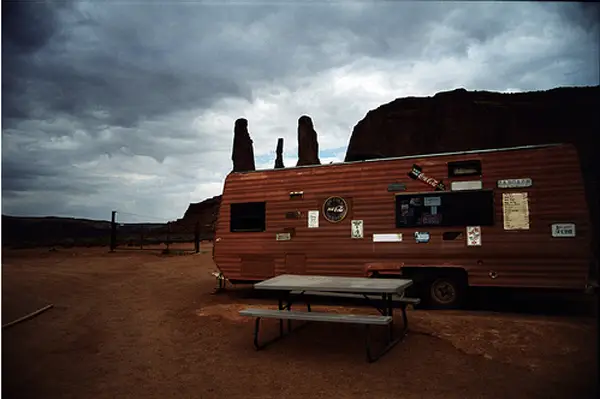
Picture With Physical Filter

As you can see from this image, the structure and tonality of the clouds has been retained, and the sky’s overall color is similar to that of the vast sea. The light that would have naturally passed through at the top has been subdued due to the slight opacity, allowing the photographer to capture a sunny scene that would have normally been scorched by the sun’s rays.
Digital Graduated Filter

The different subject matter makes it hard to draw a comparison, and the flexibility of post-production techniques leaves the manipulation purely up to personal preference; however, this brings me back to my initial point – you cannot reclaim detail once you’ve already taken the picture. However, the foreground greens set against the purples of the mountain tops shows that post production plays an increasingly important role in attaining excellent results.
A Conclusion in Contrasts
The choice between the physical filter and post-production digitalization is entirely dependent upon how much you want to either extract from what you actually see in front of you and what it is you would like to add to the image back at your desk.
If you want to make your photos look as “real” as possible with perceived sharpness and outstanding resolution, using a physical filter can make sure you take away the greatest detail possible, leaving your post-production at minimal effort.
However, the difference between each type of filter, regardless of its physicality, also lays in the style and definition you’re trying to achieve. Do you want to take a photo that is as close to the real thing as possible, or are you the type of photographer who enjoys image manipulation offered by today’s software?
Polarized filters are unsurpassed for the saturation of color, and the ND grads can bring out detail in hard-to-reach areas – and both can be used in conjunction with one another. But similarly, there is nothing to stop you capturing your images with the physical filter first, to then refine it later with software – in fact I would advocate this practice!
About the author: James markets Eversure.com, the leading name in professional-camera insurance in the UK. After growing up around photography (he is the son of two pro photographers), James pursued a career in marketing, which has led him to his current position creating educational material for photographers on behalf of Eversure. This is both for their own sites and for distribution to other key online photographic resources.


0 comments