Earn Money With Digital Photography—Promote Your Skills

This guest post was written by Laura Charon. Laura is an avid photographer who has been taking pictures for years–first with an old brownie camera and more recently with a Canon Digital Rebel XTi. You can read more of Laura’s posts at Beyond Megapixels. Contact me if you are interested in guest writing for Photodoto. -John

Congratulations! You’re ready to take the next step with your digital photography, and start earning some money with it! There are two avenues you can pursue — you can sell the photographs that you take, or you can provide your photography skills as a service to other people. Either way you go, earning money with your photography is challenging and rewarding in this highly competitive field.

lineup2 by Snerkology

In this article we’re going to talk about promoting your photography skills.

Create a portfolio — The first important step in selling your photographs is to establish a portfolio. Create a collection of the work that you are the most proud of, or that is the most applicable to the type of photography you will be performing (portraits,

Continue reading Earn Money With Digital Photography—Promote Your Skills

DSLR 101 – White Balance

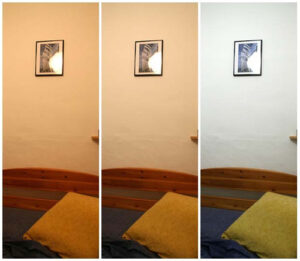
251693960_23f2711016We’re continuing with our DSLR 101 this week and today we’re explaining white balance.

What?
White balance is responsible for keeping your photos the correct temperature. A low colour temperature creates more red, a higher colour temperature more blue. Digital cameras create the correct colour temperature by picking the part of the photo that it thinks should be white and filtering the light to make that area white.

Why?
If you want natural looking photos you need the correct white balance. In other words having the correct white balance prevents your photos from looking too cold (blue) or too warm (red). Although your camera will have an Automatic White Balance (AWB) setting digital cameras are not as good at detecting which part of the photo should be white as you are.

You can get a more accurate white balance by choosing a manual setting for the white balance or creating a custom white balance of your own.

How?
Most DSLRs will let you choose a white balance from within the menu. The choices are likely to include daylight, shade, cloudy/twilight, tungsten, fluorescent light,

Continue reading DSLR 101 – White Balance

DSLR 101 – ISO

Time for lesson number two in our DSLR 101 series! Our topic today? You may have heard of it, it’s a little thing called ISO.

What?
ISO is traditionally a measure of film speed; basically how sensitive a roll of film is to light. Obviously if you’re using a DSLR you’re not using film but your camera still has ISO settings. Instead of film it’s a reference to how sensitive the camera’s image sensor is to light. ISO settings can vary greatly but most cameras have at least 100, 200, 400, 800, and 1600. The lower the number the less sensitive the sensor is to light.

Why?
Although lower ISOs are usually desirable (leave your camera on Auto settings and it’ll choose 100 or 200 most of the time) to give you clear, sharp photos there are times when a higher ISO can be useful.

Choosing a higher ISO allows you to use a higher shutter speed or smaller aperture. This is especially useful for shooting in low light, particularly shooting action in low light (for example indoor sports events or concerts). It also comes in handy in places like museums and art galleries where use of flash and/or tripods may be prohibited,

Continue reading DSLR 101 – ISO

DSLR 101 – Auto Exposure Bracketing

Do you own a DSLR but use it mostly as a very expensive point-and-shoot? Time to take off the training wheels! Join us for DSLR 101! Don’t worry we’ll take it slow, and the little green rectangle of the auto setting will always be there for you to run back to if you find yourself in over your head!

Welcome to class, first up; auto exposure bracketing.

What?
Auto exposure bracketing allows you to automatically take a series (usually three but sometimes up to seven) of photos, each at different exposures. Basically the camera takes one image at what it perceives to be the correct exposure, one underexposed, and one overexposed.

Why?
What your camera views as the correct exposure may not necessarily be the exposure that suits a particular image best. You may find that you like your photos slightly overexposed, or that for a particular shot the underexposed version appeals to you more.

Auto bracketing allows you to take the different exposure shots in one quick succession, meaning it’s almost as fast as just taking the correct exposure shot. Especially for beginner photographers this is a great way to get shots in different exposures,

Continue reading DSLR 101 – Auto Exposure Bracketing

Homemade Photo Gifts

craft ninjaPanicking over those perfect photo gifts you just can’t find/left too late to get delivered? Never fear Photodoto is here for you with some homemade photo gift suggestions.
Collage: Especially good for the college student in your life, perfect for dorm room walls, but great for Grandparents and everyone else too. Print a bunch of photos on a theme – photos of the grandkids, your daughter’s best friends, Aunt Mable’s most beloved dog – then figure out a way of arranging them together so they look awesome. You could glue them onto a sturdy backing (thick cardboard, styrofoam, or corkboard are some ideas), link them together using photo clips, or use photo corners to arrange them on a patterned background.

Poster: Head on over here and use the free motivator, magazine cover, or movie poster tools. Print and put in a frame. Simple.

Perpetual Calendar: This requires photos with numbers but you could cheat and photoshop numbers onto some of your favourite shots. Basically you need photos numbered 1 -31, photos with the days of the week on them,

Continue reading Homemade Photo Gifts

Winter Photography Tips

Yes, it’s almost Christmas and yes, there’s the tree to decorate, and those holiday cards aren’t going to print themselves, and you really should untangle those strings of lights. But winter isn’t just about Christmas so if you feel like taking a break from Santa and his friends here are a few tips for capturing some non-Christmas winter snaps.

1. Get your equipment prepared. Don’t forget spare batteries (the cold will sap their energy faster) and try and think about packing some hand warmers in your camera bag to keep your camera all warm and toasty.

2. Overexpose! One of the main problems with photographing snow is the fact it’s so shiny and white. Your camera’s light metre will struggle with all that white shininess and read it as grey. Many point and shoot cameras have a “snow” mode you can use or for a DSLR try overexposing the shots (try +1 or +2 if you have automatic exposure compensation).

3. Try a graduated filter.
For grey-sky days a graduated filter can give the sky a bit of colour and make the pictures look a little less overcast.

Continue reading Winter Photography Tips

Tips for Better Backgrounds

The next few weeks will provide plenty of opportunities for most of us to whip out the camera and snap a few portraits. From candid shots of visiting friends to the carefully composed holiday family photo, the background is almost as important as the subjects. Poorly composed backgrounds detract from the faces you want the focus on so to help you get some good portraits this year here are a few tips for getting good backgrounds.

1. Think about the background. Ok, so that one seems obvious but many people don’t give the background of their shot any thought until they’re sitting at the computer trying to crop parts of it out. Of course for candid shots you may not have a lot of control over the background but taking a quick glance before you press the shutter will give you a chance to take a step to the left and crop out that overflowing kitchen trash can.

2. Get up close. If the background is undesirable, but you can’t fix it get in close and let your subject fill the frame. This can work especially well with kids who look extra-cute close up.

Continue reading Tips for Better Backgrounds

Photo organization: How Geoff does it

Photodoto reader Geoff Coupe sent in some very helpful and detailed responses to my plea for help regarding my Great Photo Organization Project (which is still proceeding although I haven’t updated the sidebar in a little while). Here are his excellent responses to my questions (and you can read more on his blog). Thanks, Geoff!

If you’ve got a great system for organizing and archiving your growing photo collection, share it in the comments or email me a guest post for publication here. Maybe we could make a regular series of it… Thanks!

Question: As soon as I tagged my second photo I realized that I need a common taxonomy for my tags. I can’t tag some photos “Bird” and others “Birds” and still others “Winged beasts.” I need to pick a definitive tag and use it for all of my photos. How do I decide? Should all tags be plural or singular? Does it matter? Also, while I’ll be the main user of the archive for now, one day my children or grandchildren will inherit my collection, so the tags will need to make sense to other people besides myself.

Continue reading Photo organization: How Geoff does it

How do you sell your photos online?

Update: Sorry, the poll wasn’t working over the weekend. Problem is solved now (I think). Please give it another go. Thanks!

If you sell your photos online I’d love it if you added how you do it to our quick survey below (you may need to click through to see the poll). Do you use a service or do it yourself? Which service do you use? Leave some details—a mini-review, concerns, or praise for your service—in the comment area if you like.

Continue reading How do you sell your photos online?

Quick Tips for Photographing Autumn

Up here in the Northern hemisphere autumn is most definitely on its way. In my town we went from 90F+ last week to 60F this week and some rain came along too. It’s not bad news though because autumn can be the best time of year for photography. The light is great and there’s all those pretty colored leaves to document. Here are a few quick tips to help you make the most of the season:

1.Take advantage of the shorter days. You don’t need to get up at the crack of dawn to photograph a sunset and that pretty warm evening glow occurs early in the evening. So even if you’re too lazy to photograph in the beautiful first-light/last-light in summer now you can get out there and capture it.

2. Get the details. Leaves are, of course, a big part of autumn photography. Put your camera on a low f-stop and get in close, capture the color and the detail of the leaves. Don’t leave out the big picture but these closer shots can really capture the color of the season.

3.

Continue reading Quick Tips for Photographing Autumn