How to Remove Dust Spots in Camera or in Software

Are dust spots ruining your photos and you don’t know how to get rid of them? If so, you’re not alone! Dust is a common issue when taking pictures and can be a huge nuisance that affects all your photos. Fortunately, there are some easy steps you can take to remove them.

dust spots on a photo

In this article I will discuss methods to remove dust spots physically in camera and in software after the photos were already taken.

Continue reading How to Remove Dust Spots in Camera or in Software

Brush Up Your Skills!

For most of us up here in the Northern hemisphere the summer is over and we’re back to work, school, and the regular routine. Once the first day of school pics are taken it’s easy to put down the camera and forget about photography only to remember it’s existence when Halloween rolls around. But wait! Don’t do that! Practice makes perfect (or at least slightly improved) and that’s as true for photography as anything else. So keep the camera out and use these tips to keep your eyes in shape over the coming months. That way there’ll be no dust to shake off when the festive season rolls around.

1. Get down on your knees or up on a chair or really anywhere that gives you a different perspective of something you’ve seen a million times. I have a friend who gets up on the roof of her house once each season and photographs her family standing in the garden looking up at her. It gives a different perspective of the garden and makes a great portrait.

2. Get in close and practice getting some beautiful bokeh. Click here for our easy to follow guide to bokeh.

Continue reading Brush Up Your Skills!

Want to Look More Professional?

Have you outgrown Flickr? Feel you’re a bit too good for Photobucket? Recently I’ve been trying out a couple of alternatives for showing off your shots.

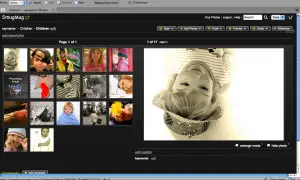
First up is SmugMug. They claim “Your photos look better here.” and actually there might be some truth to that statement. A SmugMug gallery looks very slick and professional. Here’s what one I made earlier looks like in editing mode (visitors to the site can’t see all the option bars at the top of the page):

RDavis_SmugMug

You can choose from a variety of themes depending on your asthetic preferences and make photos available to be viewed in sizes ranging from small to X3 large (plus the original size). One feature I really like, if you go for the slightly more expensive “power” account, is the option to disable visitors from right-clicking and saving your photos. A nice, simple deterrent to help keep your photos a bit safer online. You can also password protect galleries or hide urls so only people you sent the link to will be able to access them.

So far I’ve found the website easy to use and if you’re technically-challenged there’s a video to help you get started.

Continue reading Want to Look More Professional?

DIY Photography Projects

Photography can be an expensive hobby but if you’ve got a tiny bit of DIY skill, a few tools, and some free time then there are plenty of DIY photography projects to have a go at. Here are five worth a try:

Camera Chest Strap – designed to allow you to take photos while spinning a child around with two hands, though I imagine you could use to photograph any number of things while using your two hands in other activities. Looks like fun to play with and only requires scissors, some strong material, a needle and thread, and a luggage strap to make.

Remote Shutter Release – mainly for Canon cameras but apparantly also works with some Pentax and Nikon ones too. This requires a cheap handsfree phone headset and a knife and claims to be “so easy a 1st grader could do it”!

Photo  Puzzle Blocks – You know those puzzles for little kids that are made of wooden blocks? Well, here’s how to make one with your own photo (or photos) printed on.

Digital Picture Frame – This won’t be saving you any money (it costs around $100 to make) but it will make you way cooler than your other digital picture frame owning friends!

Continue reading DIY Photography Projects

Capturing Birthday Memories

ribbons_raydavisWe celebrated a 6th birthday here recently and, of course, one of the aims of the day was to get some nice photographs. But how does one go about getting good birthday photos? Well, here free of charge, are ten tips for you:

1. Have a designated photographer (or two). Get someone who is not in charge of putting the candles on the cake, keeping the dog away from the kids, paying the magician, and keeping track of which present came from which child, to keep a camera in their hands and use it often during the party. If you can get two people even better. If there are specific moments you know you want shots of let your designated photographers know what they are before the party starts.

2. Start early. The party preparation can make for some great photos too, especially if the kids are helping set up or if a family member is baking the cake.

3. Get the light right. If you’re having the party indoors try and arrange key moments like blowing out the candles and opening presents to be in an area with good lighting.

Continue reading Capturing Birthday Memories

The Big Three Basics

Recently we’ve explained some basic equipment terms so today I thought I’d continue with the beginner’s guides and introduce a few basic technical terms, starting with the Big Three:

Shutter Speed. Put in 4-year-old language this is the amount of time the shutter on your camera stays open. It is therefore the length of time the image sensor (in a digital camera) or film (in an old skool camera) is exposed to light.

Photographs are, generally, captured very quickly and so shutter speeds are measured in fractions of a second. The larger the number underneath the 1 (the denominator) the faster the shutter speed.

Moving from one shutter speed to the next halves or doubles the amount of light getting in. Slow shutter speeds can be used to introduce some blurring into a photo (e.g. a blurred background) or used with a tripod to get good night time photos.

Aperture. Again, in 4-year-old language, this is the size of the opening in the lens when you take a photograph. The larger the opening the more light that gets through the lens and “hits” the image sensor or film.

Continue reading The Big Three Basics

How to Share That Perfect Picture

So you’ve followed our tips for photographing children and got some gorgeous shots of little Madison with birthday cake on her nose. Now you want to share them with Granny and Aunt Maud on the other side of the country because you know they’ll find the cake-nose thing just too cute for words! So what’s the best way to share your photographic masterpieces with family and friends? Well, guess what here at Photodoto we’ve made a handy little guide to some of your online photo sharing options just for you, and Granny, and Aunt Maud. Here it is:

Flickr It’s the big one, everyone’s heard of it and the site has over 3 billion photos (here’s the 3 billionth). Back in the day when I first joined Flickr as a gangly teenager it was just Flickr but now it’s owned by Yahoo! so you do need a Yahoo! account to join.

A basic account is free and allows you to upload 2 videos and 100MB of photos per month, however even if you upload the original high-res shot only smaller sizes will be accessible. A Pro account costs $24.95/year and allows unlimited photo &

Continue reading How to Share That Perfect Picture

Get Summer Snap-Happy

dandelion_rdavisSummer is officially here and for now, here at least, the rain has stopped, the kids are out of school, and families are getting ready to go on holiday. Whether you want to get some summer fun photos of your kids, capture memories of your romantic holiday in Rome, or just get out and photography the landscape lighting is one of the most important things to get right and can be particularly tricky in summer. Bright light can cause all sorts of problems from glare to underexposure to squinting subjects in your portrait photos. Here are some tips to help you avoid those problems:

Use a polarizing filter
: if you’re using a D-SLR or SLR camera this is a simple solution to bright summer light, like Ray Bans for your lens a polarizer will filter out polarizing light which will provide richer saturation and reduce reflections on non-metallic surfaces.

Use your automatic settings: Your camera may have a setting for shooting in bright light (usually marked with a symbol of the sun) which can help you quickly and simply get better summer photos.

Avoid the brightest light:
Another simple,

Continue reading Get Summer Snap-Happy

Tracking Your Photos With A Reverse Search Engine

A friend recently sent me a link to a site called TinEye which is a reverse image search engine. The idea is you upload an image or paste in the url of an image and TinEye searches for that same image across the web. Although it can’t access every website it is a handy tool for anyone interested to see how their photos are being used (especially if you’ve licensed some photos with a creative commons license and would like to see what people are doing with them). It could also be useful if you’re worried about your photos being used without your permission, although all TinEye can do is point you to where the photos are being used so you can choose whether or not to take any action.

I tried TinEye out with a couple of photos I have uploaded to both Flickr, iStockphoto,and various blogs, giving the search engine the Flickr urls and it found the photos in iStockphoto and the blogs as well. TinEye says it’s the first image search engine to use image identification technology rather than keywords or metadata so in theory it should be more accurate than other similar engines.

Continue reading Tracking Your Photos With A Reverse Search Engine

A Very Basic Guide to Textures

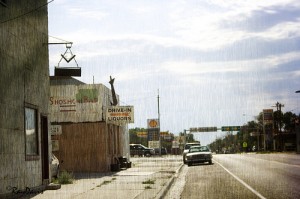
First off what do textures do? Well, things like this…
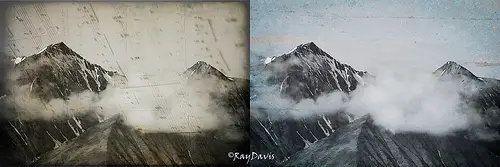
music-mountains
drive-in-liqour

yellowstone

Some are more subtle than others, obviously! So how do you add them to your photos? The easiest way is to use textures that other people have created. Some are free and some you need to pay for but either way this is what you need to do with them once you’ve downloaded them:

1. Open both the texture and the photo you want to edit in Photoshop. Click on the photo and check it’s dimensions.

2. Change the dimensions of the texture so that it’s as close to the same size as you can get it ( you can uncheck the constrain proportions box if you need to).

3. Still with the texture selected (rather than the photo) press Ctrl+A or Cmd+A (or go to file, select all) and little running lines should appear around the texture.

4. Press Ctrl+C or Cmd+C (or go edit, copy).

5. Select the photo and press Ctrl+V or Cmd+V (or go to edit, paste). The texture will be pasted over the photo so all you’ll see is the texture and not the photo underneath.

Continue reading A Very Basic Guide to Textures