Free Floral Photoshop Brushes

We are glad to offer a useful collection of free Photoshop brushes to all Photoshop fans. This showcase is focused on flowers, trees and leaves shapes. What’s more important, every brush set is absolutely free to use and you just need to download it and to install on your computer. The complete process will not take much time.

Using these Photoshop brushes you can save your time and efforts on completing different design tasks. And on the very edge of the summer these floral brushes will be of a great use for all professional and amateur photographers. These free floral brushes sets are very beautiful and will certainly look very good in any kind of graphic designs. Any of them can be a decoration of your personal photos as well as a striking element of website designs.

So take a minute to look through a collection of 20 free floral Photoshop brushes. By the way, you can also look through our round up of Retouching Photoshop Tutorials.

Floral rainbow

photoshop brushes

* * *

Continue reading Free Floral Photoshop Brushes

ScanCafe negative scanning progress (Nov 30)

Scanning progress continues. The process may be going slowly—although, I personally don’t care… these negatives have been in storage for 12 years—but ScanCafe does an excellent job of keeping you in the loop. They let me know that a technician had opened my box and was actually starting to scan my negatives.

ScanCafe progress

I got this email today:

We have assigned a technician to digitize your images and in the process we found that you have sent in negatives to us that needs to be cut into strips of 1 to 2 images in order to process them. Kindly confirm if you are fine with cutting the negative strips so that we can process your media. However, if you do not wish to cut them, we will not be able to scan them and therefore will ship them back to you as is.

I sent them medium format negatives in strips of 4 frames. I told them to cut them—carefully—as needed for the scanning process. I really appreciate that they asked first although it would have been nice if they’d also mentioned it on the ordering page.

Continue reading ScanCafe negative scanning progress (Nov 30)

ScanCafe negative scanning progress

ScanCafe logoFollowing up on my previous post about scanning some old negatives with ScanCafe. I dragged my feet and didn’t send them in until this past Monday. I was able to snag a 20% discount though so my total estimate for scanning 200 medium format negs came to $204.20 ($0.99 ea + $0.19 ea for TIFF format + shipping, etc.).

Before I sent my scans to ScanCafe, I also sent several of them to Brian Auer at Epic Edits. Brian, film scanning expert extraordinaire, scanned them using his CanoScan so that we could compare ScanCafe vs doing it yourself.

ScanCafe charges you half  up front, ships your negatives to their overseas scanning facility, lets you pick the ones you want online, then sends it all back to you. Just got an email today saying they’ve received my negatives—the process has begun. They estimate they’ll have my scans ready to view by December 27th (yes, it takes a while).

ScanCafe Order Status

I didn’t tell them I was a writer for a photography blog and I’m getting my own negatives scanned at my expense so that I can provide you with a realistic and objective view of how their service works.

Continue reading ScanCafe negative scanning progress

Free photo editors for Linux, Mac, and Windows

Can’t afford Photoshop? Can’t justify the expense? What do you need in a good photo editor anyway? To me, the absolute essential features necessary for any photo editing app are:

  • Layers and layer masks (alpha editing). These features let you selectively apply edits and filters to portions of the image that you control.
  • Painting tools. Brushes in varying sizes and hardness. For painting masks, mostly.
  • Curves. Essential. A curves adjustment tool lets you control color, color saturation, contrast, brightness, and black white points. Curves is often the only tool I use.
  • Color adjustment. Hue and saturation adjustments.
  • Channel mixer/B&W converter. Some way to make black and white photos.
  • Filters. Blur and sharpen. You don’t need page curl or lens flare.

Without further ado, and in alphabetical order, some free apps that fit the bill:

Aviary Phoenix (Web app–All platforms)

The only web/online app in the list that supports layers and masks. “From basic image retouching to complex effects, Phoenix delivers the key features of a desktop image editor with the simplicity and accessibility of a web-based application.”

Continue reading Free photo editors for Linux, Mac, and Windows

Negative scanning with ScanCafe

After a bunch of failed attempts with my ancient el cheapo scanner, I’ve decided to have a bunch of old medium format negatives (120/220) scanned professionally. I’ve all but decided on ScanCafe—haven’t pulled the trigger yet. Great prices… $0.99 each for medium format negatives. But even better, they’ll scan all 200 negatives, let me review them, and then I only have to pay for the ones I actually want—with the caveat that I have to buy at least half.

Interesting twist: they send the photos to a facility they’ve built in India. That’s how they can get a technician to scan and personally inspect/retouch each negative at such low prices. Downside: looks like it might be around 8 weeks before I see my scans (and get back my originals). But, these negatives have been sitting around since 97 so it’s not like I’m in a hurry.

I’ll let you know how it goes. Have you used ScanCafe or any other professional negative/print scanning service?

ScanCafe – Photo Scanning, Negative Scanning, Slide Scanning, Photo Restoration

Continue reading Negative scanning with ScanCafe

Review: The DAM Book: Digital Asset Management for Photographers

The DAM Book by Peter Krogh is my digital asset management bible. It is a definitive source of information about everything you need to know to get your photos organized, archived, and protected.

This book is a lot of things but let me start by telling you what it is not. It won’t teach you how to post-process your photos in Lightroom. It doesn’t include any Photoshop tutorials. It doesn’t include a camera buying guide or any gear reviews.

It will help anyone who is serious about organizing their photos get them organized.

Digital Asset Management (DAM) as Krogh defines it is: “a term that refers to your entire digital photography ecosystem and how you work with it. It comprises the choices you make about every component of your digital photography practice.” Your digital photography ecosystem is:

  • Images
  • Software
  • File formats
  • Organization
  • File storage architecture
  • Storage Media
  • Backups
  • Workflow
  • Migration

DAM has many goals including finding images when you need them, image processing, and forward compatibility.

Continue reading Review: The DAM Book: Digital Asset Management for Photographers

Want to Look More Professional?

Have you outgrown Flickr? Feel you’re a bit too good for Photobucket? Recently I’ve been trying out a couple of alternatives for showing off your shots.

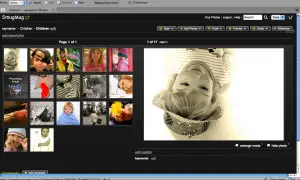
First up is SmugMug. They claim “Your photos look better here.” and actually there might be some truth to that statement. A SmugMug gallery looks very slick and professional. Here’s what one I made earlier looks like in editing mode (visitors to the site can’t see all the option bars at the top of the page):

RDavis_SmugMug

You can choose from a variety of themes depending on your asthetic preferences and make photos available to be viewed in sizes ranging from small to X3 large (plus the original size). One feature I really like, if you go for the slightly more expensive “power” account, is the option to disable visitors from right-clicking and saving your photos. A nice, simple deterrent to help keep your photos a bit safer online. You can also password protect galleries or hide urls so only people you sent the link to will be able to access them.

So far I’ve found the website easy to use and if you’re technically-challenged there’s a video to help you get started.

Continue reading Want to Look More Professional?

Give Your Work Some Flow Part 2

I guess that by now you have managed to master the basic first steps of workflow set out in part 1 and so I give you, without further ado, part 2.

Post Processing. There are many different ways of doing post processing and a plethora of software to choose from to help get your photo editing just right. Which you use will depend on which operating your computer runs on and how much money you’re willing to part with. If you have a Mac it most likely came with iPhoto already on it which will let you do editing such as adjusting exposure, contrast, fill light, sharpness, red eye removal, retouching, cropping, straightening & adding special effects such as sepia. For Windows and Linux Google’s Picasa is a great piece of free software (it is also available for Mac users if iPhoto’s not your thing) that allows similar editing control. If you’re happy with this level of editing control the best thing to do is get into the habit of transferring your photos from your camera (or card reader) directly into Picasa or iPhoto and using them to do the organising and editing parts of your workflow.

Continue reading Give Your Work Some Flow Part 2

Give Your Work Some Flow Part 1

You’ve probably heard the term workflow being bandied about in photography circles but for those among you who are a little sketchy on the details let me introduce you to the basics of giving your photography work some flow.

What is it? Quite simply it’s the steps involved in getting your photos from conception to finished product. Professional photographers (and experienced amateurs) will often have a well honed workflow that allows them to edit their photos quickly and efficiently.

Quick and efficient sounds good, but how do I make it happen? Glad you asked, this is something that doesn’t happen instantly. You need to develop your own workflow, as you become a more experienced photographer you will most likely start to develop some sort of workflow naturally. To make it quick and efficient you need to think about it and give it a bit of structure.

Ok, so where do I start? With taking the photos. Decide if you want to shoot in RAW (if your camera gives you the option) or JPEG (and which size JPEG) and if you want to use manual or automatic settings. Making these choices doesn’t mean that’s what you have to do every time you take a photo just that those are the settings you will use most often.

Continue reading Give Your Work Some Flow Part 1

Black and White Conversion: Channel Mixer Recipes

Black and white conversion is a mysterious process. There are many ways to do it and none is objectively any better than any other for every photo. So, these are guidelines, really, in the spirit of a recipe. But unlike following a recipe for baking a cake, we are not all trying to create the same photo. Keep in mind that every photo is different and will require slightly different values for any image editing technique.

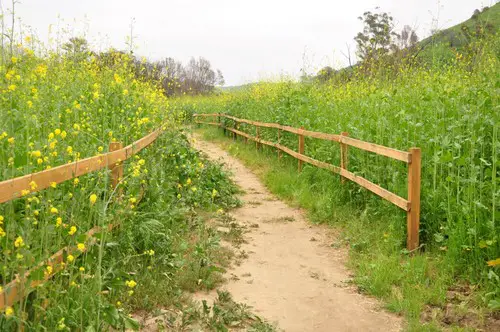
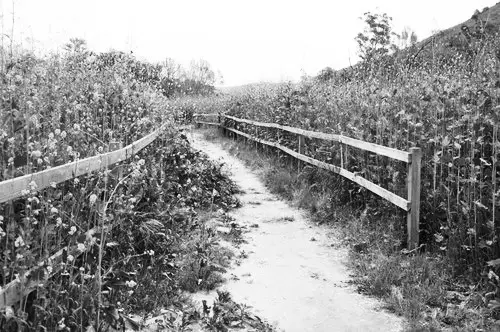
Here’s a photo I took on a hike recently with my kids:

Meadow path

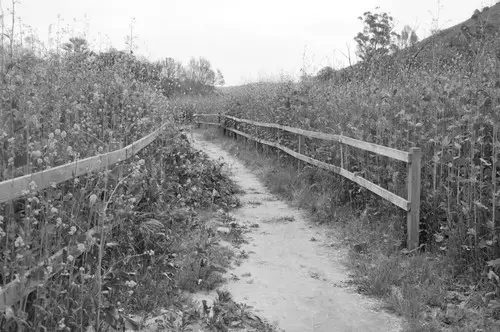
To compare with the channel mixer conversions below, first I’ll show the results from a simple average color desaturation. This is a simple conversion, it’s fast, and it’s very easy to do. In Photoshop it’s Image | Adjustments | Desaturate. In GIMP it’s Color | Desaturate.

deasat1

Many people, myself included, feel that this method often results in lifeless photos. If you’re going to convert this way, you’ll be doing yourself a favor if you also boost the contrast after the fact:

deasat2

I think the simplicity of just desaturating a photo and boosting the contrast has a lot of appeal.

Continue reading Black and White Conversion: Channel Mixer Recipes