When you are setting out to digitize your collection of old photos and film, scanning resolution is an important attribute to consider. This number is crucial when you are thinking of printing your scanned images rather than just viewing them on a screen.
 Since most people, at some point or the other, will want to create memorable keepsakes – framed prints, enlargements, photo books and more – using their digitized photos, it is important to understand how scanning resolution can impact their results.
So, here’s a little primer on resolution and what it means for your scanned images:
The math of image resolution
The resolution of an image is essentially a measure of the amount of detail embedded in it. It is typically expressed in pixels or dots per inch: 300 dpi, 600 dpi, etc. Another way of expressing this number is to calculate the number of pixels in both the length and width of an image when measured in inches. For example, a 4 X 6 image with a known resolution of 600 dpi will have a total of 2400 x 3600 pixels of visual detail in it. This adds up to 8,640,000 pixels or approximately 9 megapixels (since a megapixel equals a million pixels). Megapixels (MP) is a measure most people are familiar with. It is used frequently with digital cameras as a way to assess the sharpness and clarity of their output.
Similarly, scanning resolution is a measure of the amount of detail that a scanner can extract from an image – whether on print or film. So, if you are scanning an image at 600 dpi, you can theoretically pull twice as much detail from a given photo than with a scan resolution of 300 dpi.
When it comes to digitization, dpi is a reasonably good proxy for understanding two important things about your scanned image: 1) how sharp it will look when printed, and 2) how large it can be printed before it begins to look a little fuzzy.
It may seem reasonable to assume that a higher number is always better, but this is not entirely true. In some cases, particularly with old prints where there is insufficient image detail to work with, the scanner may end up extracting a lot of the grain in the image. In other cases, it may interpolate and fill in the gaps with empty or ‘’fake” pixels that take away from the sharpness of the image. So, it is important to consider the results you seek and what you have available to work with before picking a resolution at which to scan. Another point to keep in mind is that a higher resolution number also involves more scanning time and calls for more disk space to store the digitized image.
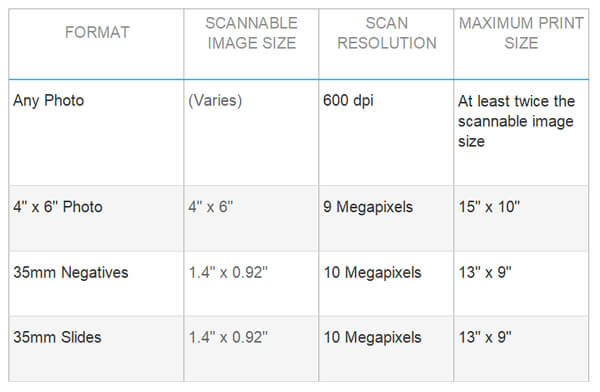
Having the ability to make quality prints and enlargements is a key requirement in any scanning project. When we scan photos, slides and negatives at our facility, we aim for a number that will allow printing at least twice the original’s size (in the case of prints) and up to 13″ x 9″ (in the case of 35mm slides and negatives).
Here’s what we believe is optimal based on the millions of scans we’ve handled:
Max Print Size for Common Scans (240ppi, up-close viewing):
These numbers support the vast majority of viewing and printing requirements. But clearly it makes more sense to consider higher scanning resolutions for negatives and slides as opposed to prints. Film scanned at higher settings is more likely to yield better quality images that show fewer defects even when you zoom into them. When you scan 35mm slides & negatives at 4000dpi (24MP), the resulting files can often be used to make much larger prints – 16″ x 20″ and beyond.
To reiterate the main guideline described earlier: think of what you are scanning and what you aim to do with the image before picking a resolution setting.
 Print photo scanned at 600 dpi
A negative scanned at 4000 dpi
For information on printing your photographs, check out this article.


1 comment