raymenie

Want to Look More Professional?

Have you outgrown Flickr? Feel you’re a bit too good for Photobucket? Recently I’ve been trying out a couple of alternatives for showing off your shots.

First up is SmugMug. They claim “Your photos look better here.” and actually there might be some truth to that statement. A SmugMug gallery looks very slick and professional. Here’s what one I made earlier looks like in editing mode (visitors to the site can’t see all the option bars at the top of the page):
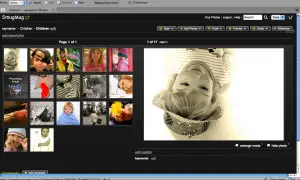
RDavis_SmugMug

You can choose from a variety of themes depending on your asthetic preferences and make photos available to be viewed in sizes ranging from small to X3 large (plus the original size). One feature I really like, if you go for the slightly more expensive “power” account, is the option to disable visitors from right-clicking and saving your photos. A nice, simple deterrent to help keep your photos a bit safer online. You can also password protect galleries or hide urls so only people you sent the link to will be able to access them.

So far I’ve found the website easy to use and if you’re technically-challenged there’s a video to help you get started.


Continue reading Want to Look More Professional?

Give Your Work Some Flow Part 2

I guess that by now you have managed to master the basic first steps of workflow set out in part 1 and so I give you, without further ado, part 2.

Post Processing. There are many different ways of doing post processing and a plethora of software to choose from to help get your photo editing just right. Which you use will depend on which operating your computer runs on and how much money you’re willing to part with. If you have a Mac it most likely came with iPhoto already on it which will let you do editing such as adjusting exposure, contrast, fill light, sharpness, red eye removal, retouching, cropping, straightening & adding special effects such as sepia. For Windows and Linux Google’s Picasa is a great piece of free software (it is also available for Mac users if iPhoto’s not your thing) that allows similar editing control. If you’re happy with this level of editing control the best thing to do is get into the habit of transferring your photos from your camera (or card reader) directly into Picasa or iPhoto and using them to do the organising and editing parts of your workflow.

Continue reading Give Your Work Some Flow Part 2

Give Your Work Some Flow Part 1

You’ve probably heard the term workflow being bandied about in photography circles but for those among you who are a little sketchy on the details let me introduce you to the basics of giving your photography work some flow.

What is it? Quite simply it’s the steps involved in getting your photos from conception to finished product. Professional photographers (and experienced amateurs) will often have a well honed workflow that allows them to edit their photos quickly and efficiently.

Quick and efficient sounds good, but how do I make it happen? Glad you asked, this is something that doesn’t happen instantly. You need to develop your own workflow, as you become a more experienced photographer you will most likely start to develop some sort of workflow naturally. To make it quick and efficient you need to think about it and give it a bit of structure.

Ok, so where do I start? With taking the photos. Decide if you want to shoot in RAW (if your camera gives you the option) or JPEG (and which size JPEG) and if you want to use manual or automatic settings.

Continue reading Give Your Work Some Flow Part 1

DIY Photography Projects

Photography can be an expensive hobby but if you’ve got a tiny bit of DIY skill, a few tools, and some free time then there are plenty of DIY photography projects to have a go at. Here are five worth a try:

Camera Chest Strap – designed to allow you to take photos while spinning a child around with two hands, though I imagine you could use to photograph any number of things while using your two hands in other activities. Looks like fun to play with and only requires scissors, some strong material, a needle and thread, and a luggage strap to make.

Remote Shutter Release – mainly for Canon cameras but apparantly also works with some Pentax and Nikon ones too. This requires a cheap handsfree phone headset and a knife and claims to be “so easy a 1st grader could do it”!

Photo  Puzzle Blocks – You know those puzzles for little kids that are made of wooden blocks? Well, here’s how to make one with your own photo (or photos) printed on.

Digital Picture Frame

Continue reading DIY Photography Projects

Capturing Birthday Memories

ribbons_raydavisWe celebrated a 6th birthday here recently and, of course, one of the aims of the day was to get some nice photographs. But how does one go about getting good birthday photos? Well, here free of charge, are ten tips for you:

1. Have a designated photographer (or two). Get someone who is not in charge of putting the candles on the cake, keeping the dog away from the kids, paying the magician, and keeping track of which present came from which child, to keep a camera in their hands and use it often during the party. If you can get two people even better. If there are specific moments you know you want shots of let your designated photographers know what they are before the party starts.

2. Start early. The party preparation can make for some great photos too, especially if the kids are helping set up or if a family member is baking the cake.

3. Get the light right. If you’re having the party indoors try and arrange key moments like blowing out the candles and opening presents to be in an area with good lighting.

Continue reading Capturing Birthday Memories

The Big Three Basics

Recently we’ve explained some basic equipment terms so today I thought I’d continue with the beginner’s guides and introduce a few basic technical terms, starting with the Big Three:

Shutter Speed. Put in 4-year-old language this is the amount of time the shutter on your camera stays open. It is therefore the length of time the image sensor (in a digital camera) or film (in an old skool camera) is exposed to light.

Photographs are, generally, captured very quickly and so shutter speeds are measured in fractions of a second. The larger the number underneath the 1 (the denominator) the faster the shutter speed.

Moving from one shutter speed to the next halves or doubles the amount of light getting in. Slow shutter speeds can be used to introduce some blurring into a photo (e.g. a blurred background) or used with a tripod to get good night time photos.

Aperture. Again, in 4-year-old language, this is the size of the opening in the lens when you take a photograph. The larger the opening the more light that gets through the lens and “hits”

Continue reading The Big Three Basics

Stop Motion Photography to Inspire

I have to admit that I am not someone blessed with much patience. I will spend an average of 8.3 seconds trying to get something to work and then get distracted and/or frustrated and move onto something else. So stop motion photography isn’t exactly my strong suit but man, I wish it was! Especially after watching these two stop-motion photography videos. Keep in mind as you watch these they weren’t shot as video rather they are made of thousands of still photographs.

Bathtub V from Keith Loutit on Vimeo.

Continue reading Stop Motion Photography to Inspire

How to Share That Perfect Picture

So you’ve followed our tips for photographing children and got some gorgeous shots of little Madison with birthday cake on her nose. Now you want to share them with Granny and Aunt Maud on the other side of the country because you know they’ll find the cake-nose thing just too cute for words! So what’s the best way to share your photographic masterpieces with family and friends? Well, guess what here at Photodoto we’ve made a handy little guide to some of your online photo sharing options just for you, and Granny, and Aunt Maud. Here it is:

Flickr It’s the big one, everyone’s heard of it and the site has over 3 billion photos (here’s the 3 billionth). Back in the day when I first joined Flickr as a gangly teenager it was just Flickr but now it’s owned by Yahoo! so you do need a Yahoo! account to join.

A basic account is free and allows you to upload 2 videos and 100MB of photos per month, however even if you upload the original high-res shot only smaller sizes will be accessible.

Continue reading How to Share That Perfect Picture

Get Summer Snap-Happy

dandelion_rdavisSummer is officially here and for now, here at least, the rain has stopped, the kids are out of school, and families are getting ready to go on holiday. Whether you want to get some summer fun photos of your kids, capture memories of your romantic holiday in Rome, or just get out and photography the landscape lighting is one of the most important things to get right and can be particularly tricky in summer. Bright light can cause all sorts of problems from glare to underexposure to squinting subjects in your portrait photos. Here are some tips to help you avoid those problems:

Use a polarizing filter
: if you’re using a D-SLR or SLR camera this is a simple solution to bright summer light, like Ray Bans for your lens a polarizer will filter out polarizing light which will provide richer saturation and reduce reflections on non-metallic surfaces.

Use your automatic settings: Your camera may have a setting for shooting in bright light (usually marked with a symbol of the sun) which can help you quickly and simply get better summer photos.

Avoid the brightest light:
Another simple,

Continue reading Get Summer Snap-Happy

GND & ND Filters…What the heck?

So there were a couple of comments on this post (actually all the comments!) related to GND and ND filters so I thought a quick post devoted to explaining the two might be appreciated by some readers. Here goes…

GND, or Graduated neutral density filters (also known as just graduated filters) are different from other filters in many ways, one of which is that they are often rectangular rather than circular but the functional difference is that part of the filter is a darker (neutral) colour that fades into the clear sections. The transition from neutral colour to clear can be either abrupt or gradual but the function is the same, reducing the difference in brightness between the ground and the sky. Therefore they are used mostly for landscape photography. GND filters also have numbers which indicate how many stops of light they reduce the brightness by.

ND or neutral density filters reduce light from all wavelengths passing through the lens across the entire filter (there is no clear part of the filter). They have three uses, firstly to reduce the brightness of light,

Continue reading GND & ND Filters…What the heck?