Both beginners and advanced photographers often encounter problems with blown-out highlights and underexposed shadows.
In two words, it’s when there is absolutely no detail left in dark and bright parts of the photo. It is also called clipping.
While some technical imperfections can be called an “author’s view”, these are most unlikely to be acquitted this way. Digital camera manufacturers always try to improve the dynamic range of the censors, which would allow to keep more highlights and shadows detail. But, even today, in XXI century, the wisest way to fight blown highlights is not $50 000 cameras or super-profound software. It’s taking an originally proper shot that gives you detail in shadows and whites.
If you get proper balance in lighting from the beginning, you will not need to look for ways to recover a photo that actually is a failure.
The most appropriate question that comes now is “How do we do that?”
Well, I do not know. You just become a good photographer and understand the laws of light.
Okay, the point is, the topic of this post is how to discover and fight these imperfections if we have them in a photograph.
There are some “danger zones” like white clothes, which are very likely to be blown out in complicated lighting conditions.
So, let’s see how we can determine that we lost detail in a photo.
1. On a camera’s LCD
You will often look at the camera’s screen and think that everything is fine. In most cases you will not be able to tell blown out highlights on a screen, unless you use some handy functions your camera probably has got.
These are:
Blinking highlights/shadows
Many cameras have an option which, when turned on, will make all blown out and underexposed areas blink with black and white, or in some cases black-n-blue for shadows and white-n-red for highlights.
This is very helpful to immediately see the zones with lost detail, but can be distracting when you just want to look through the images for, so to say, their aesthetic value. So you might want to turn it on or off depending on the situation.
Histogram
Understanding histograms is an extremely useful skill, and it definitely deserves a separate article, but for now you can remember the following:
If you have such vertical lines at the utmost left or right side of a histogram, you’ve lost some detail:
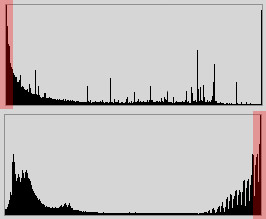
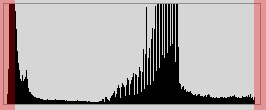
But, if you have such lines, but slightly away from the very edge, it is actually ok:
2. In Lightroom / Camera RAW / most other RAW converters
In all these editors we usually see a histogram which represents the distribution of tones from shadows to highlights:
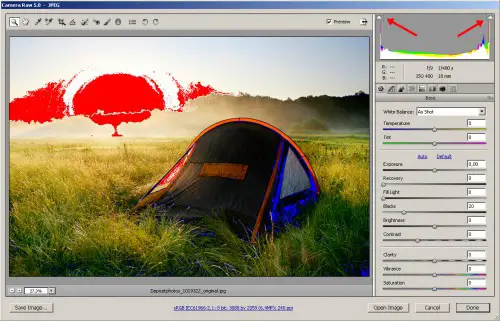
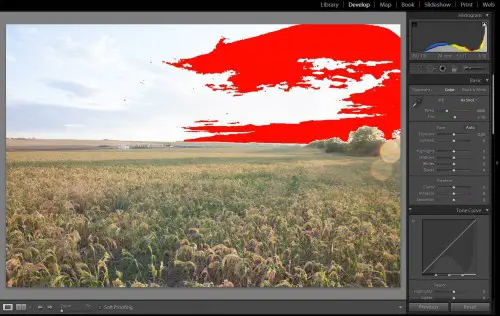
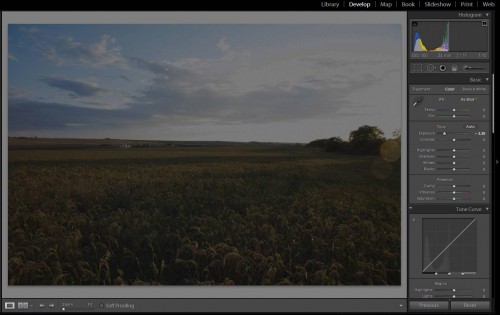
There, you can see two tiny triangles at top left and top right. If you press them, overexposed highlights will be shown as red spots, and underexposed shadows as blue ones.
In Lightroom, you must switch to Develop mode to see them.
3. In Photoshop
Create and adjustment layer for Curves, or Levels – and you will see little triangles at the bottom:
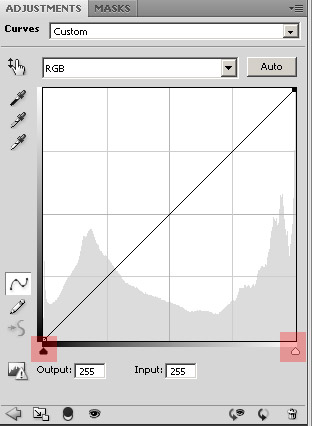
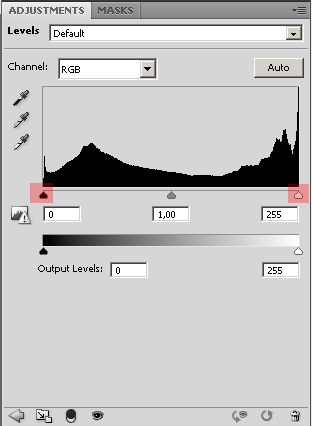
Hold ALT + left mouse button on a triangle to see the detail loss. You can actually move these triangles to adjust the contrast of the photo. You can slide the triangle back and forth, holding the ALT button, just to get the idea.
And now let us see how to fight them.
1. Expose correctly
This is a truly universal rule. Proper exposure is the key to good colors, good sharpness, low noise, good highlights, nice shadows and high self-esteem. Still, if you missed the right exposure, I have to say that it is better to lighten underexposed photos, than darken overexposed ones, because highlights are more likely to lose detail, than shadows.
2. Shoot RAW, not JPG
RAW images have really much more detail in highlights, which you can bring out during conversion.
Just have a look:
RAW, exposure 0:
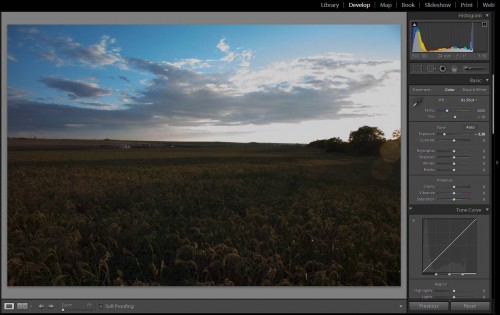
RAW, exposure -3.3:
JPG, exposure -3.3:
As you can see, RAW files are much more tolerant to software exposure shifts, and retain more details and colors.They also don’t suffer from jpg compression artifacts, which can look really ugly after strong editing.
3. In Adobe Camera RAW
Try adjusting the “Exposure” slider.
This might help if your photo is over- or underexposed.
This might not help if the scene does not fit into the camera’s dynamic range. In other words, if you have detail loss in BOTH shadows and highlights. In this case, try Recovery tool as described below.
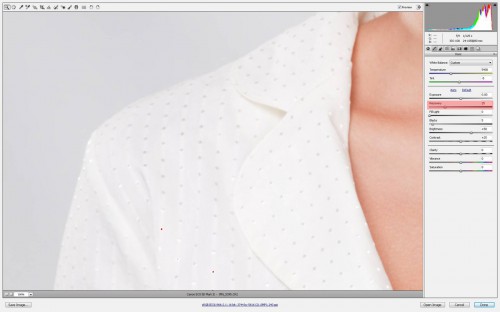
Try adjusting the “Recovery” slider.
The higher are the values, the more intensively will the program try to recover blown out highlights.
Recovery=0
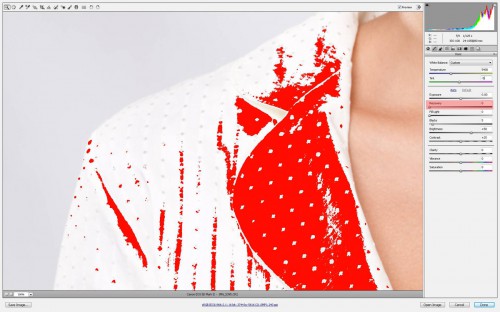
Recovery=25
3. In Lightroom
Lightroom has functions similar to Adobe Camera RAW in versions up to 3.6.
With the new Lightroom 4, we have Highlights, Shadows, Whites, Blacks sliders instead of good old Recovery.
They are quite interesting tools, which give you more control.
Here’s a good video from Adobe showing how to use these tools: Highlights, Shadows, Whites, and Blacks
4. In Photoshop
There are quite a few tricks you can do to get rid of blown out zones, but they greatly depend on a specific photo.
Clone Stamp Tool
Select the Clone Stamp Tool and set the mode to Darken and Opacity to something about 5%-10%, ALT+left click on the image part which you want to be the source for cloning, and then just paint the blown out regions. This makes sense when you have some texture which is only partially blown out, and you can find material for cloning. E.g. a white t-shirt which was blown out at one side, but has remaining texture on the other, so you can use is as a source for cloning.
Levels
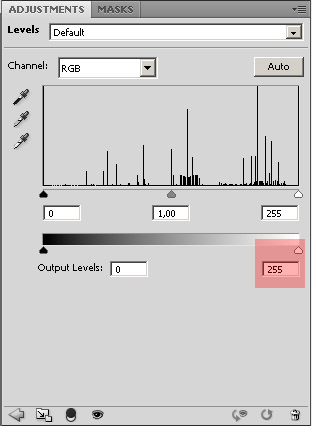
Make a Levels adjustment layer, there you will see and Output Levels option:
the second number is 255. Change it to 250 or so. Experiment with the white triangle at the right side of the slider and see how it affects the image. Now, the blown highlights are not plain-white pixels, but have a tiny gray tint. Unlike clone stamping, it won’t recover any texture.
You can do the same to slightly lighten shadows – only you will need to change the left “0” to 3 or 5, but I personally have almost never done that in practice, because, once again, we usually have problems with highlights, not with shadows.
You might also want to apply a mask to this adjustment layer to make if affect only the blown out regions.
Brush Tool
It’s the “dumbest” way to fight blown out highlights, but it some cases it might help.
Just select the Brush Tool, set the mode to Darken, opacity to 1-5%.
Set the foreground color to the one you want (e.g. some skin tones for skin, blue tone for sky) and paint the blown-out zones. The effect will be tiny, but that’s what we need in extreme highlights. Be attentive, because you can leave brush traces visible on the the nearby textures.
Afterword
These are the tools which I use to fight clipping. If you found some of these hints helpful, you are welcome to subscribe to our e-mail newsletter (it’s in the right sidebar), so you won’t miss new interesting stuff on our blog!


This is a great post for review and reminders, thanks George!
Thanks, Maureen! 🙂
Regrading: “it is better to lighten underexposed photos, than darken overexposed ones, because highlights are more likely to lose detail, than shadows.” – when shooting in RAW format, some photographers advise to shift the histogram right (without clippings). There is also evidence that the histogram is not that accurate for RAW format, so you have more room on the right side (without clipping) than the histogram actually shows – you have to check this for your camera. If you manage not to clip the image, it is better to shift the histogram right because a digital image (JPEG and RAW) has more bits for highlights than for shadows, that’s why post-processing shadows by lightening them, usually leads to a lot of noise in the images, and some sources say that it is better to post-process an image with right shifted histogram (with no clippings), because you get most out of the digital image.
Hi Patryk!
Thanks for this. I have to agree with you, but to justify myself – it works if we a speaking of properly exposed photos. You are absolutely right – as long as you can avoid clipping, it’s better to shift to the right edge of the histogram, and this will cause less noise in shadows. But speaking of “wrong exposures”, clipped highlights appear to be much more unwanted – but this is quite personal. Clippings at either side are actually bad of course.