If you are using Adobe Lightroom for editing your photos, then you might have come across the problem of duplicate images. Let me explain the right method for deleting duplicate images in Lightroom.
These duplicate images will waste unnecessary space on your hard drive and they will also make your Lightroom editing process cumbersome. So, you must delete these images permanently. It will help to improve the performance of your computer as well.
As a general rule, duplicates can be deleted in Lightroom manually for a few images and using specialized plugins some of which are free for a larger number of images.
It is somewhat easy to delete the duplicate images manually when few pictures are present. But what if there are lots of duplicates? In that situation, the manual deletion process will be hectic and not recommended.
To understand the processes needed better, lets go into where duplicates come from.
How Duplicate Images Come Into Lightroom?
There are different ways by which duplicate pictures will come into Lightroom. Knowing these sources will help to reduce the duplicates to an extent.
1. Merging Catalogs
Sometimes you may have to merge two Lightroom catalogs and there will be some common images in both the catalogs.
2. RAW + JPEG Shooting
Many photographers will be capturing images in “RAW+JPEG” format. So, the same image will be recorded in RAW format as well as JPEG format. This creates duplicate copies of the same image. You are wasting the storage space unnecessarily by storing both a RAW and JPEG version.
3. Export Photos from Lightroom To Another Editor
Some photographers use other photo editing software like Luminar along with Lightroom. So, after making all the basic edits in Lightroom, the image will be exported to the other photo editor along with Lightroom settings. Here, Lightroom creates one more copy of the image with the edits.
4. Wrong File Handling Settings
You must tick the “Don’t Import Suspected Duplicates” option in the File Handling settings of Lightroom. Otherwise, when you try to import from the same folder, then Lightroom will again import the same images that were already imported earlier.
5. Same Image in Multiple Resolutions
Sometimes you will be changing the resolution of the picture for printing and for uploading to the web. This process will create multiple copies of the image.
6. Same Images in Multiple Folders
You might have the same photos in multiple folders.
Can Lightroom Detect Duplicates?
Lightroom is a powerful photo editing software targeted toward photographers. Here is the link to buy a license if you need to. It comes with all the basic photo editing features. But, it lacks the feature to detect and remove duplicate images in the catalog. Adobe did not incorporate this feature into Lightroom.
Is It Possible To Use Library Filter Bar To Detect Duplicates in Lightroom?
The Filter bar in Lightroom comes with a search feature.
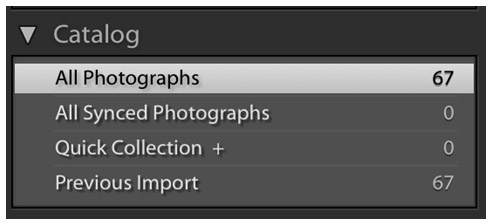
Click on the “All Photographs” section in the catalog section of Lightroom. Now, all the image thumbnails in the current catalog will be visible.
![]()
You can view the Filter bar at the top of this thumbnail section. If you are not able to see the bar, then hit the forward slash “/” symbol on the keyboard to enable it.
Click on the “Text“ section in the filter bar. Now, the text search options will become visible. You have the flexibility to select different attributes in the “Text” section. You can set “Filename” as the first attribute for search and “Starts With” for the next one. You can enter the search term in the search bar on the right side.

Enter the filename here. You don’t have to enter the file extension here. It will help you to show the duplicate copies of the image file with different file extensions. You might have created these copies for editing, printing, or publishing on the web.
You can delete the unwanted copies of the pictures here. But, this method is not a practically feasible one. You will have to enter each file name to find the duplicates and delete them manually.
Can Lightroom Remove Duplicates?
Lightroom does not come with a feature to remove duplicate images. But, there are two ways to remove duplicate images in Lightroom. One way is to delete the images manually. The manual method can be used if you have less than 100 images in the Lightroom catalog.
Otherwise, you can make use of plugins. Teekesselchen and Lightroom Duplicate Finder are two such plugins that I found really useful. These two Lightroom plugins are capable of finding duplicate photos in Lightroom. The manual method is the hard way and the plugin method is the smart way. The choice is yours.
Teekesselchen Plugin For Lightroom
Teekesselchen is a useful Lightroom plugin that is capable of detecting duplicate image files in Lightroom. It makes use of the photo EXIF data to find the duplicates in the Lightroom catalog. You can get both a Windows OS version as well as the Mac OS version of the plugin from their website. It is a free plugin. You can also donate some money if interested. You can get the installer version as well as the plugin file. Unzip the plugin file.
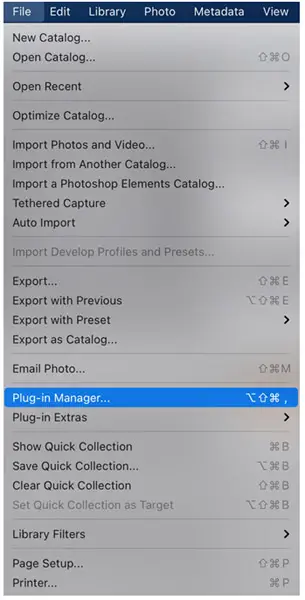
Select the drop-down menu from the “File“ menu In Adobe Lightroom. Click on the “Plug-in Manager”.
The “Lightroom Plugin Manager” window will pop up now. Click on the “Add” button. Now you need to browse and locate the unzipped Teekesselchen plugin file. Now, the plugin is installed and activated. Click “Done” to exit from the popup window.

Now, Go to the “Library” drop-down menu and click on the ”Plug-in Extras”. Click on “Find Duplicates” under the Teekesselchen folder.
A “Teekesselchen: Find Duplicates” window will pop up. Here, you will have the option to choose different EXIF parameters to find the duplicate pictures. The default setting is good enough to do the job. Click on the “Find Duplicates” button at the bottom of the window to start scanning the images in the current Lightroom catalog.
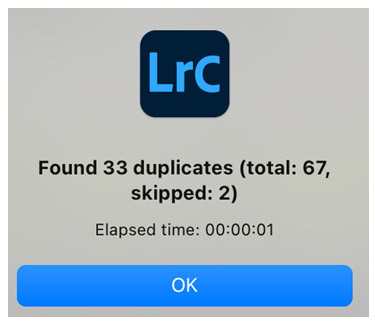
Once the scanning is complete a window will pop up showing the number of duplicate images in the catalog.
The plugin will not delete the duplicate images by itself. But, it will mark the duplicate photos with the Rejected photos flag.
You may not want to delete all the duplicates. Certain duplicates will have a different style of edits that you want to keep. So, I strongly recommend going through all the marked duplicate images and remove such pictures from the duplicates collection.
You can click on the “Photo” drop-down menu and select the “Delete Rejected Photos” option to delete the marked duplicates. A new window will pop up. You can click on the “Delete from Disk” option to delete the photo from the hard drive.
I found this Teekesselchen plugin to be very useful and it is also free. It does a good job of finding duplicate images. So, you can definitely give it a try.
Lightroom Duplicate Finder 2 Plugin
The Lightroom Duplicate Finder is another plugin that can find duplicate photos in Lightroom. It is a paid software and costs around $15. You can also get a trial copy for free. The trial version of the software will only find a few duplicate photos. You need to get the paid version to find all the duplicate pictures. Both Windows and Mac OS versions are available for this plugin.
You can download the zipped file from their website. Unzip this folder. You will get the installation file and the user manual.
Go to the File drop-down menu in Lightroom and select “Plug-in Manager”.
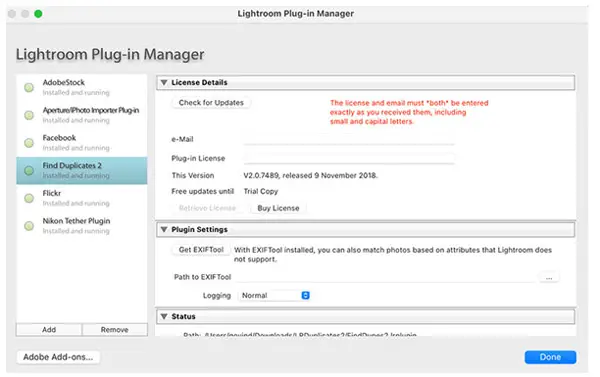 A new Lightroom Plug-in Manager window will pop up. You need to click the “Add” button. Browse and select the plugin package. You can click on the “Buy License” option if you are interested to purchase a copy. Click the “Done” button to complete the process.
Now, go to the “Library” drop-down menu and click on the “Plug-in Extras”. Click on “Find Duplicates”.
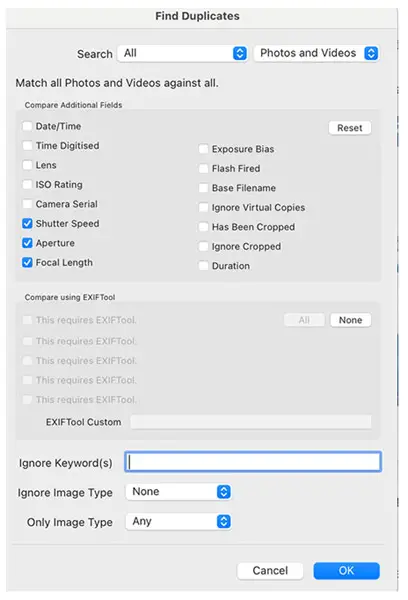
A new window will pop up showing the different settings option for the “Find Duplicates”. You can select the different EXIF parameters which you want to compare to find the duplicates. Click the “OK” button to start the scanning process.
Once the scanning is complete, a window will pop up showing the number of duplicates.
You can click on the “Duplicates” in the “Collections” to view all the duplicate pictures. All these duplicates will be marked with the “Rejected Flag” by the software.
Now, go back to the image catalog. You can go to the “Photos” drop-down menu and select the “Delete Rejected Photos” option. You can click on the “Delete from Disk” option to remove the photos completely from the hard drive.
You can also follow the video below from Signature edits for a better understanding of the workflow:
Both these plugins will only find duplicate image files. You need to delete the identified duplicate files yourself. I recommend you to try both the plugins.
How Do I Delete Multiple Photos in Lightroom?
You can view the photos as thumbnails in the Library section of Lightroom. Select the image which you want to delete and hit “X” on the keyboard. Now, a crossed black flag will be shown on the top left corner of the image thumbnail. It indicates that the image is rejected from the catalog. You can continue doing this process for multiple pictures.
Now, click on the “Photo” drop-down menu from the top toolbar in Lightroom. Select the “Delete Rejected Photos” option from the bottom of the drop-down menu.
Now, a new window will pop up. It will ask whether you want to remove the original photo from the disk or remove the photo from the catalog alone.
You can click on the “Remove” button if you only want to remove the pictures from the catalog alone and not from the hard drive.
If you want to delete from the catalog and hard drive, then click on the “Delete from Disk” button to remove the actual images from the disk.
How Do I Clean up Lightroom?
You can clean up the Lightroom catalog by deleting the unwanted images and the duplicates. There will be many duplicate images that eat up a good amount of storage space in your hard drive. You can use any of the two duplicate detection plugins mentioned above to remove the duplicate pictures. The other unwanted images need to be deleted manually. It will be easy to remove the other unwanted images once you delete all the duplicate images in Lightroom.
How Do I Permanently Delete Files from Lightroom?
You have the option to permanently delete pictures from your Lightroom.
If you are a Mac user, hold “Cmd” and select all the pictures in the Lightroom catalog that you want to delete. Once the selection is complete, hit “Cmd + Option + Shift + Delete” to delete the photos.
If you are a Windows user, hold “Ctrl” and select all the pictures in the Lightroom catalog that you want to delete. After completing the selection process, hit “Ctrl + Shift + Alt + Delete” to delete the pictures.
Where Do Deleted Photos Go in Lightroom?

So now you have deleted the images in Lightroom. But where will all these images go?
If you have chosen the option “Delete from Disk”, then you can find the pictures in the “Bin” in the case of Mac OS and the “Recycle Bin” in the case of Windows OS.
If you want to restore these delete pictures, then you will have to go to the “Bin”/ “Recycle Bin” and restore it from there.
Once you empty the “Bin” or the “Recycle Bin”, then the pictures deleted from Lightroom will be permanently removed from your computer. If you empty the “Bin” or the “Recycle Bin”, then you will not be able to retrieve the images again.
If you have chosen the “Remove” option, then the actual images will be still there in the hard drive. The images will be removed from the Lightroom catalog only. If you want to bring back the pictures that are deleted from the catalog, then you need to import these files from their actual locations on the hard drive.
I hope that this article has taught you all you need to know about deleting duplicates in Lightroom.
You can click on the following link to learn about the 10 Must Use Lightroom Plugins.


5 comments