One of the most common problems people have when taking photos is that part of the photo (usually the part that they want to see) is too dark or too bright. For example, when taking a photograph of a friend in front of the sunset, the sunset will show perfectly but the friend is a dark, unrecognizable blob. The problem is that the range of brightness in the scene is too much for your camera to record. So it has to “decide” which parts of the photo it wants to keep (the sunset, in this case) and which parts aren’t as important. And it often gets it wrong.
There are several remedies but they all require that you, the photographer, recognize when you are in a situation that will cause your camera to become confused. Basically, any scene with very bright highlights in it (like the sunset) along with darker areas (your friend) can cause you problems. Fortunately, that’s easy to recognize—you just have to get in the habit of checking for it by practicing.
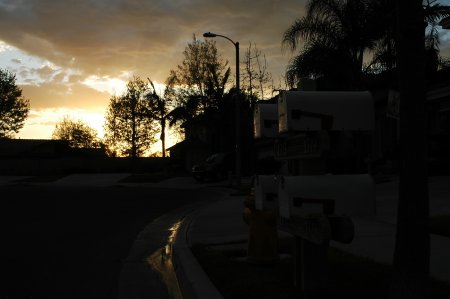
I took some shots last night to illustrate this. The first is a shot exposed for the sunset. There are houses, cars, mailboxes, and a tree in the foreground but you can’t see them.
The first method of fixing this situation is to realize that your camera will underexpose the foreground and adjust the settings to compensate. There are lots of ways to adjust the exposure including by shooting fully manual. Read our previous articles on understanding exposure if you’re fuzzy on the topic: Understanding Shutter Speed, Aperture, ISO, Your Light Meter is Stupid, and Managing Dynamic Range. In my case, I adjusted the shot by adding three stops of exposure through the exposure compensation dial on my D70.
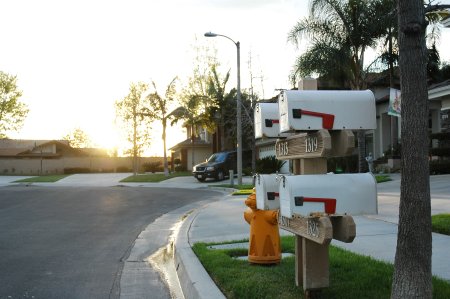
The foreground is now properly exposed but look what happened to the background! That’s pretty good and if you care more about your friend than the sunset then you might be done at this point. But can’t we have our cake and eat it too? There are two other things you can do. The easiest is to use a flash or other light source for the foreground. A flash will light everything within about 20 feet but it has no effect on objects farther away (like the sunset). So you can adjust your exposure for the sunset and use the flash to light the foreground objects.
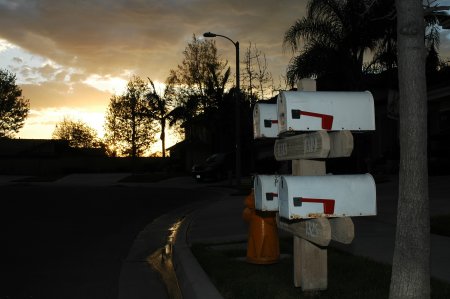
This technique works great when you have people in the foreground and it is very easy to do. Just popping your flash in full auto mode will probably give you a result like this. It’s definitely an improvement over the first shot.
A more advanced way of dealing with this problem is through a technique called High Dynamic Range photography. HDR images are a way of increasing the apparent exposure range of a shot by blending multiple shots at different exposure settings into a single image. There is software available to do this automatically but you can also apply the technique using image editing software like Photoshop, Paint Shop Pro, or The GIMP. Any software that supports layers and layer masks will let you create HDR images. The technique is to layer the different exposures one on top of the other and use the layer masks to seamlessly blend the exposures together into a new image. The HDR image below is made from five different exposures blended together using layer masking:
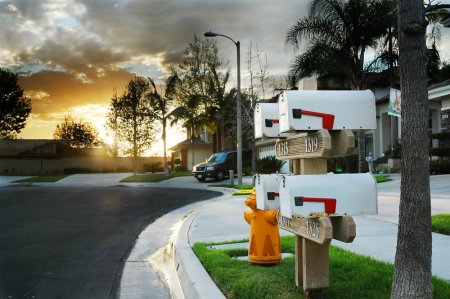
It took me about two hours to get to this by hand and I’m still not sure I like it. The problem, as I see it, with HDR images is that it’s easy to make them appear unnatural. Even our eyeballs and brain, as advanced as they are, don’t see the world this clearly. HDR is an advanced technique and is tricky to get right.


I would take the first pic in the list, and then adjust the shadows afterwards to make them a little more ‘visible’, but not too much; cause when they are too bright (like the last picture), the sunset looses the attention.
I do like the HDR version you’ve come up with – works really well for me, never looking like it’s part of the hyper-real HDR trend, which I hate.
Another technique I like is slow shutter with flash. Even most point and shoots have a ‘Night Shot’ mode which flashes the foreground then holds the shutter open to grab the BG. It’s better for night shots (of course) but in this situation I’m guessing it would net you something between photos 2 and 3.
I like your HDR image as well. I agree that too many of the HDR images (especially on flickr) are so overly done as to look very unnatural. Not like what I see thru my eyes at least.
A slight HDR with 50% opacity over the layer with the normal exposure is my choice.
This is why we bracket and focus on different objects in the scene. It never hurts to do a little burning and dodging in photoshop either.