There are only 7 basic notes in music. There are only three colors on a computer screen. So, digital photography should not be that difficult. But ok, forget it, we all know it is too good to be true. When all you have is a set of bricks, building a castle does not become easier.
Enough metaphors for now – let’s talk about postprocessing.
“Good artists copy, but great artists steal”
Pablo Picasso
Photo editing programs give us incredible ways to alter the original photo, having so much tools, that often we get really really confused. Take Lightroom for example. Just for the mere brightness and contrast adjustment we have a dozen different sliders! This is perfect for a professional, but is a nightmare come true for those of us who have just started submerging into the abyss of photography.
And when it comes to color sliders… My Goodness, Lady Gaga has less scenic costumes!
When you are a professional, you have all of them in your head and can move them around and see the difference in your mind without even turning the computer on.
And that’s a good thing to do, but the problem is, “you can’t start from where I am” if I am a worldwide recognized photographer (which I am not.. yet) and you’ve just installed Lightroom this morning.
But…due to the rules of the genre, we have a solution! Thunderstorm of kettledrums… and Ladies and Gentlemen, please welcome the
LIGHTROOM PRESETS!
A preset is a ready set of adjustments which is applied to a photo by a single click. Yep, it is that easy. But it’s not magic – it is just someone else has done the job beforehand.
As an artistic person, you may have in mind a picture you want – say, you want something soft and dreamy, or whatever. Just look for a preset suiting your vision, and you’re done.
And what’s even better, you can use the preset as a starting point and make further adjustments yourself. You’re already inspired, but you see that some adjustments must be done to match a certain photo. Then you just take a preset and customize it, which is of course easier than starting from scratch.
Creating your own presets
Whether you go creative or just bring a photograph to a “basic normal” level, it is always a good idea to make your own preset from the adjustments you’ve made. You may then apply it to some other photo in future, or use it to edit a series of similar photos.
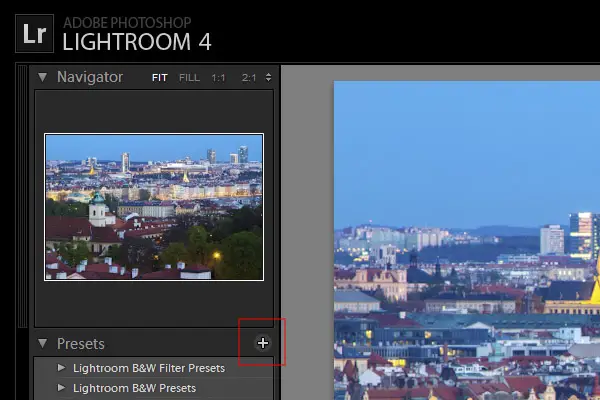
To make a new preset, go to Develop Mode, make all the adjustments to the photo that you want to save as Preset, go the the Presets tab at the left side of the screen (if you haven’t customized your workspace otherwise), and press the “+” button:
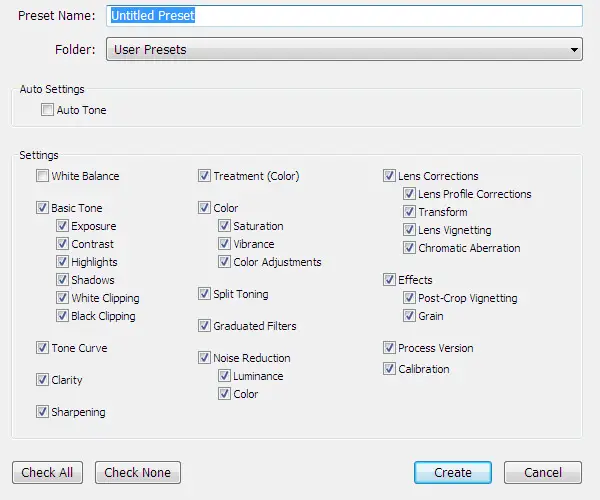
You will see a window where you can choose a folder to save the preset, it’s name and also a set of adjusments you want to be saved in the preset. If you, for example, adjusted color, contrast, and made lens corrections in the photo, but you don’t want to save the lens correction manipulations in the preset, just uncheck the corresponding checkbox.
Time to Hack Your Workflow
Now that we know how to make our own presets, we can start taking our photo editing workflow to the next level. What can we do?
- Make several sets of presets for different genres – portrait, landscape etc.
- Ask our friends and collegues if they have some presets of their own to share
- Download ready presets from the Internet – there are both free and paid, you just have to look around a bit
Making you own groups of presets is not a one-day task. It would be simply wise to make new presets every time you edit a new series of photos. Sadly, we often forget our own revelations, and when we get an awesome-looking photo, we might forget the way we achieved it in some 6 months.
I bet you have some fellow photographers who will be happy to help you and share their own presets. Well, even if not, at least you could give it a try.
And the easiest way of getting a library of presets is getting one from the Internet. There are plenty of resources offering free and paid presets, so you can just take some time and investigate.
Customizing presets
Though presets may appear quite universal, many of them will require slight adjustments to fit your own photos.
The main points you should consider when applying a preset is exposure shifts, shadows and highlights. if your photo is very bright, and a preset has some adjustments which makes a photo even brighter, you might get a totally blown out image in the end.
In this case, you will need to lower the exposure slider, or the highlights slider, depending on the most affected tonal range.
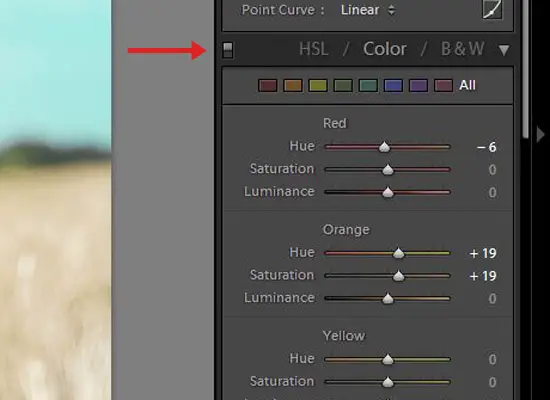
Or, a model on a photo is wearing a green dress. And the preset was designed for optimization of summer portraits with lots of grass and foliage – so it shifts the greens to some other tone. And you don’t want the dress colors to change. Then you must go to the color sliders and pull the greens back to 0.
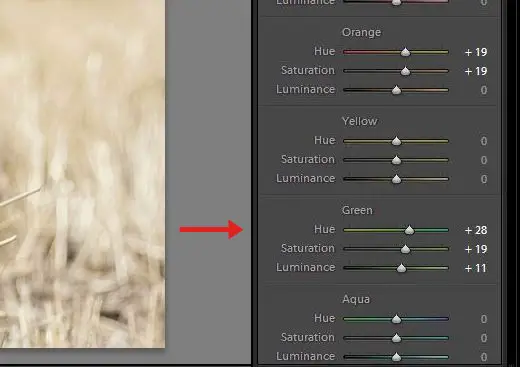
There are hundreds of situations possible – sometimes it can be not 100% clear why the colors or gamma shifted away – just try browsing through all the settings and switching them on/off, to see if this is the thing that annoys you and spoils all the fun.
But once again, if a photo is properly exposed and does not have any extremes, a well-made preset should work with just one click.
RAW vs. JPG
Though Lightroom allows you to edit both JPG and RAW images, and apply presets to them, I highly recommend that you switch to RAW, if you haven’t yet, because it gives you so much more space for editing your photos. To keep it simple – RAW contains twice as much data, and allows you to resurrect overexposed and underexposed photos, and preserves more detail when you (or a preset you’ve downloaded) apply some strong contrast adjustments.
Conclusion
As you can see, Lightroom is very friendly for both beginners and pros, so if you still think whether you should try it – stop thinking and go to Adobe’s site and download the trial version of Adobe Lighroom 4:
https://www.adobe.com/cfusion/tdrc/index.cfm?product=photoshop_lightroom
Let the fun begin!


