Why does the eye see a thing more clearly in dreams than the imagination when awake? — Leonardo da Vinci
Have you ever shot a photograph of someone with their back to a bright source of light such as the setting sun or sky? Was the person underexposed (too dark)? This is a direct consequence of what is called dynamic range and “compromise” metering being done by your digital camera. The human eye is an amazing thing. Modern cameras don’t even come close to touching the capabilities of your average, human optic system. One astounding feat is its ability to see detail in every part of a scene consisting of a huge range of dark and bright areas. You can see detail in shadow and in bright areas simultaneously. It’s something you take for granted — until you start taking photographs with a digital camera.
Dynamic range is the term used to describe the range of brightness levels that can be recorded in a single exposure. The range of brightness from the darkest shadow to the brightest highlight is the dynamic range. Depending on the exposure settings (shutter speed, aperture, ISO), a digital camera can record detail in dark areas or very bright areas — but not both at the same time. Digital cameras do not have the dynamic range of the human eye. You can chart the dynamic range of a photograph by counting the number of pixels at each brightness level in a photograph and putting them on a graph, called a “histogram,” like this:

Sample histogram
“Compromise” metering is what happens when you have a scene with a large dynamic range and you let the camera meter off of the entire scene. It “sees” the bright and dark areas and decides on a compromise exposure that will render some of the bright area and some of the dark area. What you typically end up with is a washed out, underexposed subject. If the camera had a large enough dynamic range, compromise exposures wouldn’t be necessary.
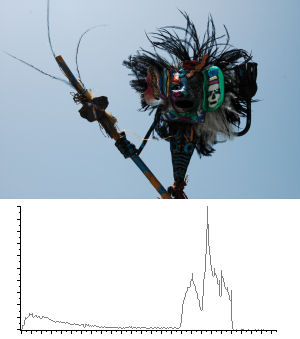
Compromise exposure with histogram. 1/640s @ f/8
Notice how the histogram shows that all of the brightness is within
the dynamic range and yet the photo is muddy. This is the compromise
the camera has made to fit everything into the available dynamic range.
Practically speaking, what this all means is that if you have a scene with bright and dark areas, you have to choose which is more important to you and set your exposure for that area. If you have a scene with both bright and dark areas and you expose for the darker area, the bright area will fall outside of the dynamic range and will be rendered featureless and pure white. If you expose for the bright area, the dark area will fall outside of the dynamic range and will be rendered featureless and pure black. [There are techniques for blending multiple exposures together to recapture the full dynamic range of a scene called High Dynamic Range Imaging, or HDR for short. But that’s a complicated subject deserving of its own article which I’ll write about in the future.]
Fortunately, there are a few easy remedies:
Change the metering mode
Most cameras have multiple metering modes. The default mode on most cameras is called “scene” mode (or something similar). This mode takes an average reading from everything in the scene to calculate exposure. This works great if the scene doesn’t have a lot of contrast. A mode that isn’t as common is called “spot” metering. This literally just uses a tiny dot in the center of the frame for metering. This mode allows you to take very precise meter readings of specific objects but is much trickier to use. In scenes with a wide range of contrast, switching to “center-weighted” metering (sometimes called “portrait” metering) is an easy solution that usually works pretty well. In this mode, only objects in the center portion of the frame are metered. This gives you more control over what your camera will use as a basis for calculating exposure without being as unforgiving as spot-metering. For example, you can use this mode to meter a subject in the center of the frame and the surrounding bright and dark areas will be ignored. This allows you to get a correct exposure for your centered subject.
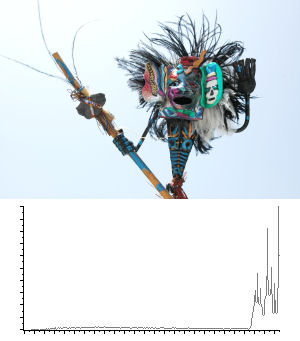
Exposed for subject with histogram. 1/320s @ f/8
This example was exposed for the subject but notice what has happened
to the histogram. It has been shifted towards the brighter side of the
scale and is even being clipped on the far right side. It extends beyond the
dynamic range of the camera. But that’s okay because the exposure for
our subject is now correct. The clipped region on the histogram corresponds
to the bright area of pure white in the upper-left hand corner of the photo.
Lock the exposure
Even if your camera doesn’t support different metering modes (or you just don’t want to switch modes all the time) you can still meter your subjects correctly with this trick. The only requirement is that your photo has an “exposure lock” button. The exposure lock button should become one of your best friends. Simply, it allows you to meter off of one subject, “lock” the exposure, recompose your scene, and take a photo using the locked settings. Usually the exposure lock button is a button on the camera that must be pressed and held until the shutter is released. It’s beautifully simple, if requiring a little finger dexterity. Here’s how to do it: move close to your subject or zoom in so that the subject fills the frame. Lock the exposure. Now move back (or zoom out) and recompose. Shoot the photograph. The photo will be recorded using the exposure settings you “locked in” earlier.
Use manual settings
This requires your camera to have a manual mode. Cameras with a manual mode will usually have an indicator somewhere on the camera or in the viewfinder to indicate the correct exposure. The technique works exactly like locking the exposure except when you get to the “Lock the exposure” step you will manually set the exposure (change the aperture and shutter speed) until the correct settings are indicated. Then move back and shoot with the manual settings.


Nice post. I think anyone shooting in a semi-automatic mode needs to understand exposures and metering modes if they are going to get the types of shots they expect. You illustrate that well.
I put together some further content describing metering modes that I think provide a few more examples in addition to your about the various metering mode options here: http://blogs.adamparkerphotography.com/blog/Metering-Modes-How-When-and-Why-to-use-them/25/
Thanks again for your post, it was a good read.