I was reading a discussion the other day about how shooting in RAW mode saved some under-exposed shots. Accepted wisdom seems to be that correcting under and over exposure is much easier/better with RAW than JPG. Without making any judgments, I decided to try it out and see if it was true.
I shot the same scene from a tripod 19 times. The first shot was with the correct exposure as a baseline. From there I shot 6 frames, each under-exposed by one full stop from the previous shot (i.e. the last shot was 6 stops under-exposed). I did that in JPG Fine and then in RAW.
I also shot 3 over exposed in both JPG and RAW (last shot was 3 stops over-exposed). Then I attempted to correct each of the under/over-exposed images using Adobe Lightroom. For the under-exposed shots, I just let Lightroom figure out the exposure by clicking the Auto Exposure button. For each of the over-exposed shots, I manually adjusted the exposure and highlight recovery sliders until I got the best result.
No other adjustments were made (e.g. color or white balance). JPG optimization settings in camera were set to Normal, white balance was Sunlight.
Here are the results. Each of the images below is the JPG version. Roll your mouse over the images to see the RAW version. One thing you’ll notice aside from the exposure differences, is that the color of the JPG versions is more vibrant.
It’s a visible example of the kind of processing your camera does to an image during the JPG conversion process. Pay more attention to the exposure, detail, and noise levels in the comparison images.

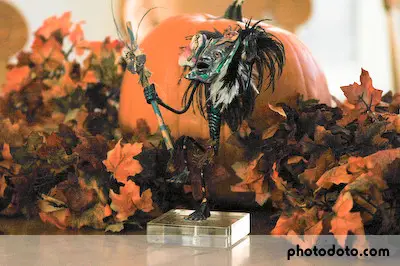
Correctly exposed baseline 1/30 @ f/2.8
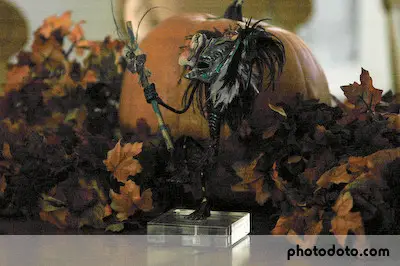
Under-exposed
Roll over image for RAW version.

1-stop under

2-stops under

3-stops under

4-stops under
5-stops under
6-stops under
Over-exposed
Roll over image for RAW version.

1-stop over

2-stops over
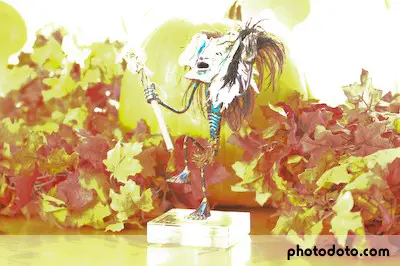
3-stops over
Conclusion
It should be immediately apparent that the ability of this camera to capture low-light detail is much better than its ability to capture highlight detail. Even at six full stops under-exposed, we’re still able to make out the subject. The 3-under photo looks much better than the 3-over photo. This makes sense since digital sensors are typically much better at recording detail in dark areas than in highlights.
Overall, I give a slight edge to RAW for recovering detail in under-exposed photographs. I say “slight” because you have to under-expose by four stops or more before it becomes an important factor. At 3-stops under, the corrected JPG still looks okay.
However, RAW is apparently much better than JPG at recording highlight detail, even at just one stop over. The over-exposed RAW images revealed much more detail in post-processing than the JPG versions. Even in the highlights of the under-exposed photos, the RAW version reveals more detail.
So, which is better? Well, if you routinely under-expose by four or more stops or over-expose by one or more, then shooting in RAW could help you correct those photos. Also, if you’re not sure how you should expose, then you should err on the side of under-exposure since under-exposed shots are easier to correct. But, if you expose correctly in the first place (or even within one stop either direction), you should be able to get great shots out of the camera no matter what file format you use.


Raw is an unprocessed file, JPG has been processed by the in-camera computer and any adjustments to it in any photo editing program are limited by what you have to work with. By this I mean, adjusting for one positive thing usually has a negative affect somewhere else on the image.
It is commonly accepted that digital has a 5/10ths exposure latitude to what can be considered a “workable” image in post processing, that is 3/10ths under exposed and 2/10ths over exposed, that is it. Film has considerably more. When you over expose and hit pure white with digital, shooting RAW or JPG won’t matter, that data is gone. When you under expose, you increase the possibility of noise appearing in the image as you post process it, this is compounded by your ISO settings. If you are shooting 400 and higher ISO and have underexposed by more then a half stop, any noise in the digital file will be greatly exaggerated and could increase to an unacceptable level, forcing you to use noise reduction software, such as Noise Ninja or a Fred Miranda ISO X plugin for Photoshop, resulting in a slightly softer image then originally shot.
It should also be mentioned that making any corrections to JPG files or RAW files on a non hardware calibrated monitor is like editing with your eyes closed. If you don’t calibrate your monitor, then you could be seeing a perfectly exposed file show up as under or over on your monitor, make a correction and be very unhappy with prints (made at home or with a lab).
When discussing the relative merits of RAW vs JPG in regard to correcting exposure, one of the biggest advantages to RAW is that you can “develop” your RAW file in different ways to compensate for exposure flaws. For example, if you had shot a very contrasty scene in RAW, you could develop your RAW file once for proper exposure in the highlights, and once for proper exposure in the shadows and then combine the two exposures in an image editing program. This is really where RAW shines in regard to getting proper exposure for difficult lighting situations. This is the very basic essence of “high dynamic range” photography, though true HDR utilizes many exposures along the full range of tones available in a given scene.
Getting a bit technical for me there, however, i find the best method is to shoot in RAW + JPG for all my shots, and use the JPG for computer/web use. I keep a backup of all my RAW shots and if i ever want to print anything or use it commercially, i’ll use the RAW.
Any JPG that is produced on the camera can be recreated from the RAW file with a bit of editting, so my question is usually ‘is the JPG good enough to use?’.
RAW is usually better, as it captures the photo in all aspects. Therfore, if you want to mess with the white balance, EV, or the such, it can be done afterwards in the camera’s provided program. Perhaps I like using this because I’m a tad bit lazy and don’t like sitting around getting the camera to take it just right.
RAW is a great format for people who like to change the photo after the shoot, and to try variations. This especially helps recover photos you could never possibly go reshoot.
I was, for a while, artist in residence at a live music joint. Shooting in dark conditions and no flash allowed. Unlike professional music photographers I was allowed to photograph for most of the show so in most cases managed a few good photos and lots of not so good. Professionals usually only get to photograph the first two or three songs. A lot of the shots were well under exposed, but because I was shooting in raw I was able to rescue a lot more than if I had been shooting JPG.
If the shot is important and you have the time for image manipulation I would always recommend shooting in the raw format
Mike Panic’s response to the article is misleading. Attempting to recover what appear to be blown highlights is often more successful in RAW development software. Why? Unless all channels are completely blown in a significant area, the best RAW editors do a good job of reconstructing the missing data and provide what feels like an extra stop of latitude compared with in-camera JPEG conversions of high-contrast scenes. Spend a month or two shooting both and you’ll never doubt the difference. You can see this very, very clearly in the one-stop-overexposed shoot-out John has included above. The overexposed and corrected RAW image has pulled back enough background shading to give much needed depth to the picture. The identically overexposed and corrected JPEG has lost the background information completely. Why? Because the information from the colour channels that *weren’t* blown was discarded during the in-camera JPEG compression and is now gone forever. So yes, it’s correct to say, as Mike does, that ‘when you over expose and hit pure white with digital, shooting RAW or JPG won’t matter, that data is gone’ but what he didn’t say is that it’s often the in-camera JPEG conversion that gets you your pure white (on all three channels). That is exactly what has happened with the one-stop overexposed image above and accounts for the difference between the corrected RAW image and the corrected JPEG image, both originally overexposed to the same degree.
The ‘Recovery’ function in Lightroom is excellent – it targets areas where highlight data looks as if it has been lost completely and manages an excellent reconstruction job with cranking up exposure values throughout the image. Current Nikon cameras include *almost* overexposed areas in their flashing highlights display (previous models didn’t) so if you see a few small areas flashing in a relatively low contrast scene, the exposure is likely off by less than one stop and there’s a good chance that Lightroom will fix it up beautifully, giving you back your detail… unless you shoot JPEG.
Now we just need an equivalent article – with examples – to explain why shooting RAW helps so much when you’re unsure about white balance settings. Again, the JPEG compression routine will discard the information that is correctly calculated to be unnecessary given the camera’s white balance result; this is the very information you will later need if you need to make significant adjustments to the colour temperature of your picture without generating lots of noise – when shooting RAW, the white balance setting applied by your camera is nothing more than a starting point guide for your RAW development application and does not affect – in the slightest – the information included in the RAW image file produced by the camera.
‘With cranking up exposure values’ should read ‘without cranking up exposure values’ in my reply above. 🙂
All of the information on this page is very clear and helpful. Thanks to the author and all of the commenters.
Given how big CF cards can be these days (and how cheap disk space is) I think I will always shoot fine JPGs and RAW at the same time from now on.