Bokeh. Have you heard this term used in conversations while looking at a photo, listened while someone proclaimed that the bokeh in a photo was good or bad, but you’ve been too embarrassed to ask just what it is? Its something every photographer should understand because it affects your image. And whether you know it or not, you’ve probably evaluated the bokeh in your own photos.

Well hide your shame no longer. After reading this article, you will be able to hold your head high and raise your nose as you talk about the bokeh in your next photo.
Table Of Contents:
- What is Bokeh?
- Camera Lens Factors
- Camera Type Factors
- Interplay Between Lens and Camera
- Examples of Bokeh
- Common Mistakes When Trying to Achieve Good Bokeh
- Causes of Bad Bokeh in a Lens
- Fixing Bad Bokeh
- Using Bad Bokeh Creatively
- I’m on a budget. Can I still achieve good bokeh with cheaper lenses?
- Budget-Friendly Lenses with Good Bokeh
- Lenses Known for Producing Good Bokeh
- Lenses Known for Producing Ugly Bokeh
- Tips for Stellar Bokeh Photography
What is Bokeh?
So, what is bokeh, exactly? Simply, when someone talks about bokeh they are referring to the out of focus portion of a photograph, usually the background, especially highlights in the background that can appear as blurry circles. Bokeh comes from the Japanese word boke which means blur (Wikipedia: Bokeh). When photographers discuss bokeh they are talking about its aesthetic quality. And as silly as it might seem, bokeh can be an important consideration in many photographs.
But isnt blur, well, blur? Well, no. Different scenes shot with different cameras and different lenses at different apertures all produce different bokeh. Any one of those factors can change its character. Now, obviously, bokeh is subjective. Many people dont care about it at all. But many others consider bokeh an important part of a photograph, particularly in portrait photography. In fact, some people consider it so important that they will buy thousand dollar lenses that give you a little extra control (Nikon, for example, has a couple of lenses with defocus control that affects the bokeh such as the Nikon 105 mm DC-Nikkor and 135 mm DC-Nikkor). We will go into all these aspects below.
Only you can decide if you like a particular photos bokeh or not. Its a matter of taste. But in general, smooth bokeh with blurry, round highlights, soft edges and uniform brightness is preferred over harsh bokeh with polygonal highlights and hard edges. One thing you definitely dont want bokeh to do is steal attention away from your subject by being distracting (unless, of course, your subject is the bokeh itself).
Camera Lens Factors
Let us go over how your equipment determines the type of bokeh you will achieve:
- Aperture Shape: The shape of the aperture (the opening that controls the amount of light entering the lens) affects bokeh. A lens with a circular aperture tends to produce a more pleasing, rounded bokeh, while a lens with a hexagonal or octagonal aperture produces a more angular bokeh.
- Number of Blades: The number of blades in the aperture also impacts bokeh. More blades typically result in a more rounded bokeh, while fewer blades produce a more angular one.
- Lens Design: The optical design of the lens, including the arrangement of elements and groups, influences bokeh. Some lenses are designed to produce a specific type of bokeh, such as a “dreamy” or “swirly” effect.
- Focal Length: The focal length of the lens affects the perspective and compression of the image, which in turn influence bokeh. Longer focal lengths tend to compress the background, making bokeh more pronounced.

Camera Type Factors
- Sensor Size: The size of the camera’s sensor affects the depth of field and, consequently, bokeh. Larger sensors tend to produce a shallower depth of field, making bokeh more pronounced.
- Crop Factor: Cameras with a crop factor (e.g., APS-C or Micro Four Thirds) can affect bokeh due to the reduced sensor size.
- Lens Mount: The lens mount type can influence bokeh, as different mounts may have different optical designs or restrictions.
Interplay Between Lens and Camera
The interaction between the camera lens and camera type can produce unique bokeh characteristics. For example:
- A fast prime lens on a full-frame camera can produce a creamy, rounded bokeh.
- A zoom lens on a crop sensor camera may produce a more angular bokeh due to the smaller sensor size.
- A mirrorless camera with a specific lens design can produce a distinctive bokeh pattern.
In my experience shooting portraits and nature, I’ve found that prime lenses such as 85mm and 50mm by Nikon and Canon give a nice smooth bokeh without a high cost. When I shoot headshots and make the eyes the sharpest part of the photo, keeping the depth of field deep enough to have the entire face in focus, the bokeh effect makes the viewer concentrate on the subject and connect with him or her.
Examples of Bokeh
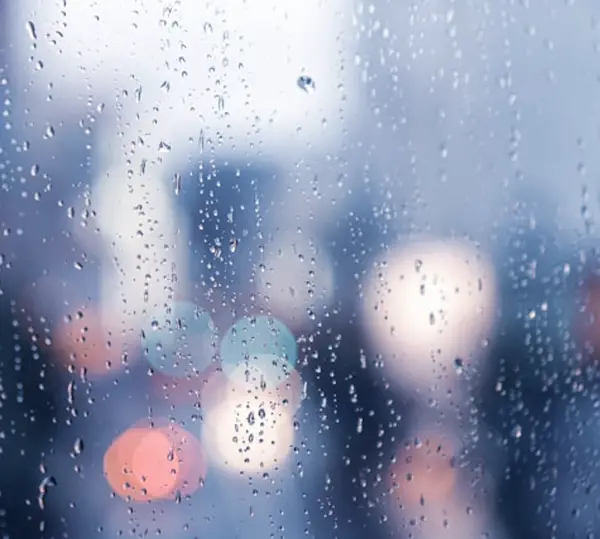
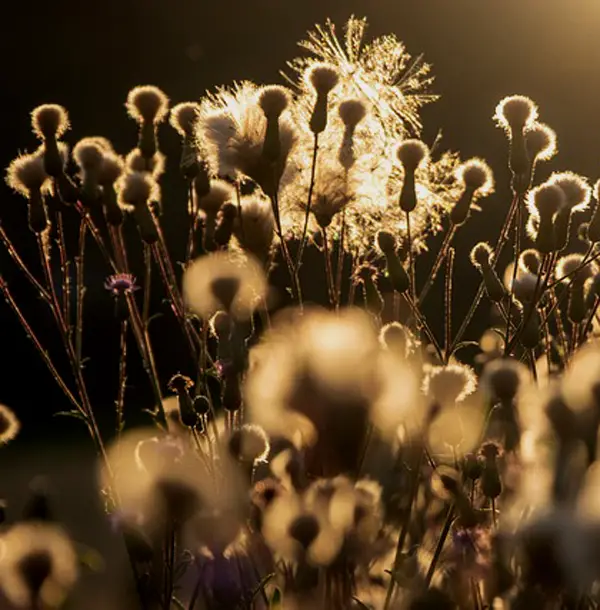
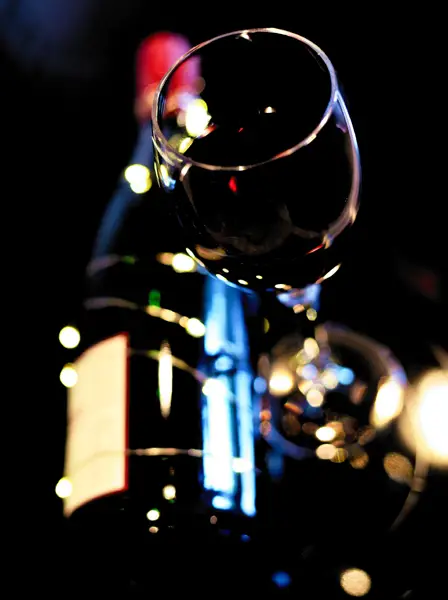
Below are a few representative examples of bokeh.

Smooth, delicious bokeh. 1/60s @ f/2.8

Bokeh example. 1/400s @ f/5.6

I rather like how the christmas lights stand out in this. 1/125s @ f/2
Common Mistakes When Trying to Achieve Good Bokeh
Here are some common mistakes people make when trying to achieve good bokeh:
1. Not Understanding the Lens’s Bokeh Characteristics
Not researching the lens’s bokeh performance, aperture shape, and number of blades can lead to disappointing results.
2. Shooting at the Wrong Aperture
Shooting at the wrong aperture can result in unpleasing bokeh. Experiment to find the sweet spot for your lens.
3. Insufficient Distance between Subject and Background
Not maintaining a sufficient distance between the subject and background can make the bokeh appear busy and distracting.
4. Incorrect Focusing
Incorrect focusing can lead to a blurry subject and unpleasing bokeh. Make sure to focus accurately on your subject.
5. Overlooking the Background
Not paying attention to the background can result in distracting elements that ruin the bokeh.
6. Not Using the Right Shutter Speed
Using a shutter speed that’s too fast or too slow can affect the bokeh. Experiment to find the right shutter speed for your scene.
7. Not Considering the Lighting
Harsh lighting can make bokeh worse. Shoot during the golden hour or use soft, diffused light to create a more pleasing bokeh.
8. Not Experimenting with Different Angles
Not experimenting with different angles and perspectives can limit your creative options and result in uninteresting bokeh.
9. Relying Too Heavily on Post-Processing
While post-processing can enhance bokeh, relying too heavily on it can lead to unnatural-looking results. Focus on capturing good bokeh in-camera.
10. Not Practicing and Experimenting
Not practicing and experimenting with different techniques, lenses, and scenarios can limit your understanding of bokeh and prevent you from achieving the desired results.
By avoiding these common mistakes, you can increase your chances of capturing stunning bokeh that enhances your images.
Causes of Bad Bokeh in a Lens
Bad bokeh, also known as “busy” or “nervous” bokeh, can be distracting and detract from the overall image quality. Here are some common causes of bad bokeh in a lens:
1. Aperture Shape and Number of Blades
- Hexagonal or octagonal aperture: These shapes can produce a “busy” or “angular” bokeh, especially when the aperture is stopped down.
- Fewer aperture blades: Lenses with fewer blades (e.g., 5 or 6) can create a more angular bokeh, while lenses with more blades (e.g., 9 or 11) tend to produce a smoother, more rounded bokeh.
2. Lens Design and Optical Aberrations
- Spherical aberration: This type of aberration can cause bokeh to appear as “onion rings” or “circles of confusion.”
- Coma aberration: Coma can result in bokeh that appears as “comet-like” or “tear-drop” shapes.
- Astigmatism: This aberration can cause bokeh to appear as “football-shaped” or “elliptical” blobs.
3. Distortion and Field Curvature
- Barrel distortion: This type of distortion can cause bokeh to appear as “bulging” or “blob-like” shapes.
- Pincushion distortion: Pincushion distortion can result in bokeh that appears as “pinched” or “elliptical” shapes.
- Field curvature: This phenomenon can cause bokeh to appear as “smudged” or “unsharp” blobs.
4. Lens Elements and Groups
- Too few lens elements: A lens with too few elements may not be able to correct for aberrations, leading to bad bokeh.
- Improperly positioned lens elements: If lens elements are not positioned correctly, it can lead to aberrations and bad bokeh.
5. Sensor Size and Camera Type
- Small sensor size: Cameras with smaller sensors (e.g., point-and-shoot cameras) can produce a more pronounced “busy” bokeh due to the increased depth of field.
- Camera type: Certain camera types, such as mirrorless cameras or DSLRs with a specific lens mount, can affect bokeh due to the design of the lens mount or sensor.
6. Lens Age and Quality
- Older lenses: Older lenses may not have the same level of optical quality as modern lenses, leading to bad bokeh.
- Low-quality lenses: Lenses with lower optical quality can exhibit bad bokeh due to the presence of aberrations and other optical flaws.
7. Focusing Issues
- Front or back focus: If the lens is not focusing correctly, it can lead to bad bokeh.
- Focusing on the wrong plane: Focusing on the wrong plane (e.g., the background instead of the subject) can result in bad bokeh.
Fixing Bad Bokeh
If youve got distracting bokeh in your image, here are a couple of things you can do:
- Open the aperture. The wider the aperture opening, the fuzzier the background will become.
- Close the aperture. The smaller the opening, the sharper everything will be. If nothing is out of focus, there is no bokeh.
- Change the distance between you and your subject. Bokeh looks different at different distances.
- Compose your scene so that there are no bright highlights in the background. Bright highlights are often the culprit when a photo is said to have bad or distracting bokeh.
- Change lenses. Different lenses will produce different bokeh. Its for this reason that some lenses are said to have good bokeh.
Update: Photodoto reader, Dave, sends in an example of what he considers really bad bokeh. Below is portion of the background from that photo:

Notice the odd, distracting texture from hard edges in the highlights. Thanks, Dave!
Using Bad Bokeh Creatively
While bad bokeh is often considered a negative aspect of a lens’s performance, it can be used creatively to add interest and depth to an image. Here are some ways to use bad bokeh creatively:
1. Emphasize the Subject
Use bad bokeh to create a busy, distracting background that draws attention to the subject. This can be particularly effective in portrait photography.
2. Add Texture and Interest
Bad bokeh can add texture and interest to an image, especially when used in conjunction with a shallow depth of field. This can create a sense of dimensionality and visual interest.
3. Create a Sense of Movement
Fast-moving subjects can create a sense of blur and motion in the background, which can be enhanced by bad bokeh. This can add energy and dynamism to the image.
4. Experiment with Unconventional Composition
Use bad bokeh to create unconventional compositions that challenge the viewer’s expectations. This can add a sense of surprise and intrigue to the image.
5. Create a Dreamy or Surreal Effect
Bad bokeh can be used to create a dreamy or surreal effect, especially when combined with other creative techniques like intentional camera movement or multiple exposures.
6. Highlight the Lens’s Character
Some photographers enjoy the unique character of a lens with bad bokeh, and use it as a deliberate aesthetic choice. This can add a sense of personality and style to the image.
7. Use it as a Storytelling Element
Bad bokeh can be used to tell a story or convey a mood. For example, a busy, distracting background can create a sense of anxiety or chaos.
8. Combine with Other Creative Techniques
Combine bad bokeh with other creative techniques like panning, tilting, or intentional camera movement to create a unique and interesting effect.
By embracing the unique characteristics of a lens with bad bokeh, photographers can turn a perceived weakness into a creative strength.
I’m on a budget. Can I still achieve good bokeh with cheaper lenses?
While it’s true that more expensive lenses often have better bokeh, it’s not impossible to achieve good bokeh with cheaper lenses. Here are some tips to help you get the best bokeh possible with a budget-friendly lens:
1. Understand the Lens’s Strengths and Weaknesses
Research the lens’s characteristics, including its aperture shape, number of blades, and optical design. This will help you understand its bokeh performance and work around its limitations.
2. Use the Lens’s Sweet Spot
Every lens has a sweet spot where the bokeh is optimal. This is usually around 2-3 stops down from the maximum aperture. Experiment to find the sweet spot for your lens.
3. Shoot Wide Open (but Not Too Wide)
Shooting wide open can create a more pleasing bokeh, but be careful not to go too wide, as this can introduce aberrations and make the bokeh worse.
4. Experiment with Different Aperture Shapes
Some cheaper lenses may have a more angular aperture shape, which can produce a less pleasing bokeh. Try experimenting with different aperture shapes using DIY aperture masks or specialized filters.
5. Use a Lens with a Higher Number of Blades
Lenses with more aperture blades tend to produce a more rounded, pleasing bokeh. Look for lenses with 7 or more blades.
6. Shoot at the Right Distance
The distance between your subject and the background can affect the bokeh. Experiment with different distances to find the sweet spot for your lens.
7. Pay Attention to Lighting
Harsh lighting can make bokeh worse. Shoot during the golden hour or use soft, diffused light to create a more pleasing bokeh.
8. Post-Processing Can Help
While it can’t replace good bokeh, post-processing techniques like selective sharpening and noise reduction can help enhance the bokeh in your image.
Budget-Friendly Lenses with Good Bokeh
Here are some budget-friendly lenses known for their good bokeh:
- Canon EF 50mm f/1.8 STM (~ $125)
- Nikon AF-S Nikkor 50mm f/1.8G (~ $220)
- Sony E 50mm f/1.8 OSS (~ $300)
- Fujifilm XF 35mm f/2 R WR (~ $200)
Keep in mind that while these lenses have good bokeh, they may not be as good as more expensive lenses. However, with practice and experimentation, you can still achieve great results with these budget-friendly options.
Lenses Known for Producing Good Bokeh
Here are some examples of lenses known for producing pleasing bokeh along with links to their reviews:
1. Canon EF 85mm f/1.2L II USM
This lens is renowned for its creamy, rounded bokeh and is a favorite among portrait photographers.
2. Nikon AF-S Nikkor 58mm f/1.4G
This lens is praised for its smooth, rounded bokeh and is often used for portrait and street photography.
3. Sony FE 50mm f/1.4 ZA
This lens is known for its beautiful, rounded bokeh and is a popular choice among Sony full-frame camera users.
4. Zeiss Milvus 85mm f/1.4
This lens is highly regarded for its smooth, creamy bokeh and is often used for portrait and wedding photography.
5. Fujifilm XF 56mm f/1.2 R
This lens is praised for its beautiful, rounded bokeh and is a popular choice among Fujifilm X-Series camera users.
6. Olympus M.Zuiko 45mm f/1.2 PRO
This lens is known for its smooth, rounded bokeh and is often used for portrait and street photography on Micro Four Thirds cameras.
Lenses Known for Producing Ugly Bokeh
Here are some examples of lenses known for producing unpleasing bokeh, along with links to their reviews:
1. Canon EF 28-80mm f/3.5-5.6 II
This kit lens is often criticized for its busy, angular bokeh.
2. Nikon AF-P DX NIKKOR 18-55mm f/3.5-5.6G VR
This kit lens is known for its harsh, onion-ring bokeh.
3. Sony E 16-50mm f/3.5-5.6 OSS
This kit lens is criticized for its busy, angular bokeh.
4. Tamron 18-270mm f/3.5-6.3 Di II VC PZD
This superzoom lens is known for its harsh, onion-ring bokeh.
5. Sigma 18-250mm f/3.5-6.3 DC OS HSM
This superzoom lens is criticized for its busy, angular bokeh.
These are just a few examples of lenses known for producing pleasing bokeh. It’s essential to read reviews and try out lenses before making a purchase to ensure they meet your specific needs and preferences.
Please note that bokeh is a subjective aspect of lens performance, and what one person considers “ugly” bokeh, another person might find acceptable or even pleasing. It’s essential to read reviews and try out lenses before making a purchase to ensure they meet your specific needs and preferences.
Tips for Stellar Bokeh Photography
The main difference between the camera and your eye is focus. Your eye has a nearly unlimited depth of field, whereas a camera does not. It makes it practically impossible for a camera lens to truly capture what can be seen with the human eye. Instead of fighting this limitation, many photographers choose to embrace it, making a feature of the out-of-focus parts of a photograph.

Here are 6 tips to help you improve your bokeh photography:
1. Know what you’re trying to achieve
Bokeh describes the quality of the blurred area that falls outside the depth-of-field. Visualize what role you want this blurred area to play for your viewer, and how much weight it should have in relation to the subject of the photograph.
2. Use a large aperture
Nice bokeh is created by using a large aperture, which lets in lots of light and decreases the camera’s depth of field. This in turn creates the out-of-focus background effect we’re looking for. Set your camera to Aperture Priority mode and select a low f-number. You can use anything from f/1.8 up to f/4, but remember, the lower the better.
3. Compose your shot (and get close!)
Leave plenty of distance between yourself and the light source, and make sure that you have manual focus selected on your camera. To ensure that you get good bokeh, you want to get as near to your subject as possible. Don’t be afraid to get up close and personal. In addition to this, try and make sure that the background is far away.
4. Use your zoom
As well as getting up close to your subject, extending your lens to the longest focal length also helps create beautiful, creamy bokeh. Quality is important here, as when using cheaper zoom lenses the image quality can drop off significantly at the highest zoom range.
5. Light up your background
Well lit backgrounds give great bokeh. By using small, glowing light sources like Christmas, traffic and street lights, you can create beautiful, soft circular patterns that will really enhance your foreground image. If you use a consistently lit background you’ll just get a general blur that is much easier to achieve, but far less impressive.
6. Experiment
Once you’ve got to grips with the basics, play around with things like silhouette to create even more distinction. Light up your foreground object to cast a dark shadow between it and your background – the strong black contrasts fantastically with the soft, bokeh highlights.
Remember, bokeh shouldn’t be used in attempt to make an uninteresting image interesting. Don’t get complacent. Bokeh should be used as a tool to complement what’s already a striking image. Make it your priority to find interesting subject matters that are begging to be photographed, and above all, have fun with it.
I hope you find this article useful and it opens up a world of experimentation and great imagery for you. Click here to learn more about aperture.


