Sometimes you come home with what you thought was a great shot, just to find out that it is way underexposed and without any better exposures of that composition. But, how can you save the underexposed photo in Lightroom? Of course, first of all, it would be better to get the exposure right on location, lesson learned, right.
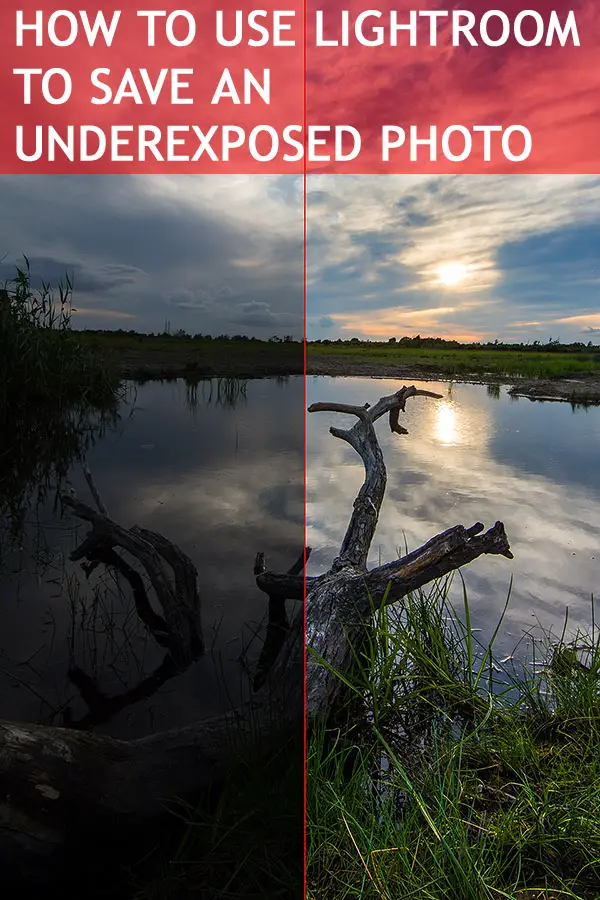
But if you haven’t got the possibility to get to this location again anytime soon, it would be good if you could save the underexposed photo and still get a great looking photo out of it.
Always Shoot In RAW-format
An important note is that if you want to be able to recover a very underexposed photo, you must capture it in RAW-format. You have no chance of recovering nearly as much data if you shoot in JPG- format.
Processing The Underexposed Photo In Lightroom
Let us have a look at how we can use Lightroom to fix an underexposed photo.
Turn On Highlights/ Shadows Alert In Lightroom
The first thing you should do is to activate the highlight and shadow alerts by clicking on the two small arrows in the upper left and right side of the histogram.
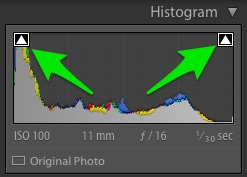
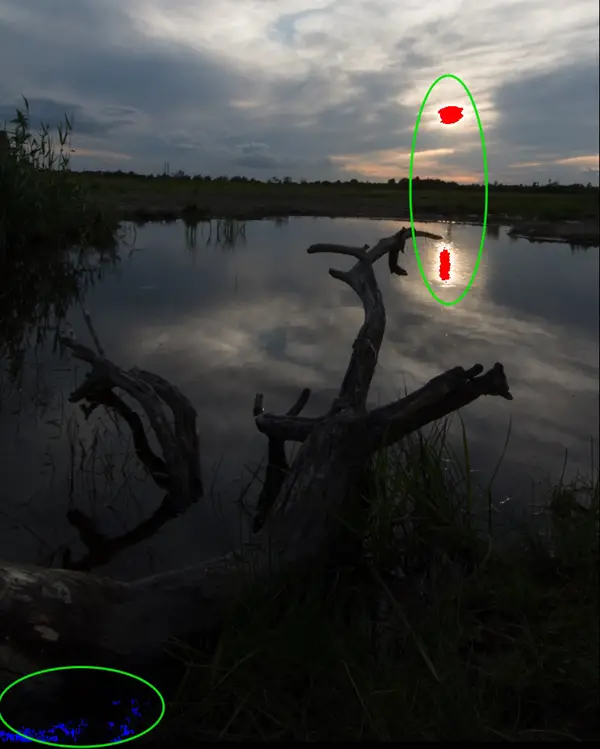
Activating the highlight/shadow alert will show a mask with red and blue colors that indicates which areas gets clipped in either the shadows or the highlights. The goal is to either eliminate or at least minimize the clipped areas as much as possible.
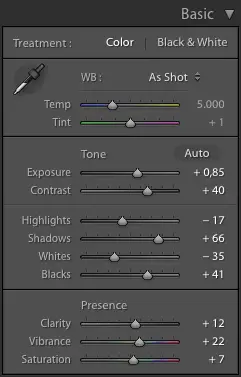
Brighten The Blacks And Shadows As Much As You Can
You can use the general exposure slider in Lightroom to make some of the exposure corrections, however, if you have highlights in the image, you have to be careful that these don’t get blown out when using the exposure slider as it corrects both the shadows, mid-tones, and highlights. With highlights in the photo, you should skip the exposure slider and move straight on to recover details from shadow areas alone.
To work with recovering the dark areas only in your photo, you should use the black slider and shadow slider tool.
Adjust these sliders by moving them towards the right.
Often the trick is to use a combination of increasing the exposure, lowering the highlights, but mainly lifting up the shadows.
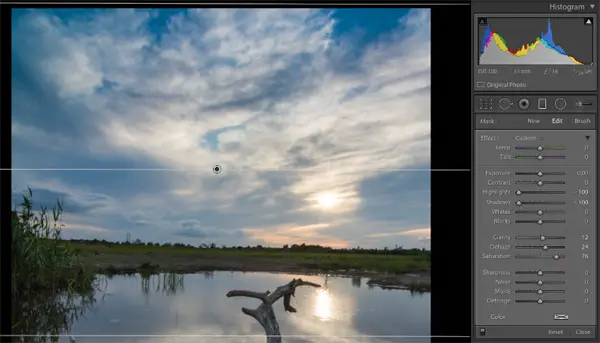
Using Graduated Filters To Correct Exposure
Recovering details in the shadows and black areas work on many photos. However, in other photos, like a sunset photo, the photo will only be partly underexposed. I.e. the sky might be well exposed, while the foreground is underexposed. In this case, you need to combine the above corrections with a gradual filter. If you lift the shadow tones of the entire image, you will also brighten the shadow areas in i.e. the clouds, making them look very flat and uninteresting. You can counteract this by applying a gradual filter to the upper part of the image. Look for the local adjustments panel on the right side of the screen and choose the gradual filter tool.
![]()
Next, drag from the top of the image, down to just below the horizon to make the gradual filter apply the adjustments to this area. As the goal is to bring back details in the sky area, you should lower the highlights and shadow tones of the gradual filter. In this sample, I also chose to add a little dehaze and some saturation to boost the colors.
Handling noise issues
When recovering an underexposed image, you are likely to get some issues with digital noise.
Therefore you should visit the noise reduction and sharpening sliders in the sidebar and push it a little to the right until you find the right balance between removing noise and maintaining details sharp.
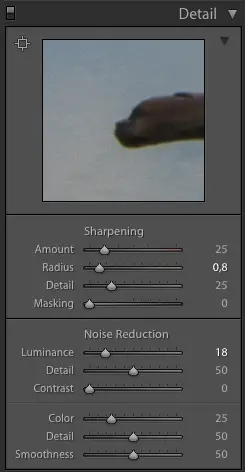
Remember to zoom in on the image and use the details loupe to check different areas for noise.
Blue colored areas will often show more noise than other areas. The same goes with areas without texture. Texture is great at hiding noise. But be sure to handle noise in the other areas.
Below you can see the final result of saving the underexposed image using Lightroom.

Concluding words
It is amazing how easy it is to save an underexposed image when you shoot in RAW-format. However, if you need to “rescue” your images often, I suggest that you learn to use the histogram when capturing your shots, so you get home with the best possible starting point.
To check out Adobe Lightroom click here.


2 comments