Great black and white photography is stunning. It’s eye catching, emotive, and expressive. Usually, it’s also wonderfully simple. So is still life photography.

In this article, I’ll give you seven tips on how to create stunning black and white still life photographs.
Before we get into the tips I’d first like to answer a couple of foundational questions:
- What makes a good black and white photo?
- What is still life photography?
What makes a good black and white photograph?
Eye-catching black and white photography relies on crafted lighting and composition. You have no colors to rely on so you must strip down to the essentials.
Regardless of your subject, whether you’re photographing a mountain or a shoe, how your subject reflects light into your camera creates the mood of the photo.
Compositional structure draws the viewer into your frame and holds their gaze. The relationships between the elements you’re photographing and their tones will make your photograph either strong or weak.
What is still life photography?
Photography of inanimate subjects is the art of still life photography. Think of food photography for Instagram or product photos for Amazon. These are two of the more common practical uses for still life photographs.
But still life photography is also fine art. You can arrange any group or objects you like on your kitchen table and create black and white still life fine art photos.

The Beauty of Black and White Still Life Photography
Simply control. Photographing in black and white strips away distractions and still life gives you control. Combining these two aspects of photography you have an awesome opportunity to learn so much.
Light is the essence of photography. Without it, you cannot take photos. The more you understand and appreciate light, the better photographer you will become. Thinking in black and white you must consider the relationships between elements you’re photographing. What tones are they? How does the light reflect off each surface? Is the contrast dynamic?
Strong black and white photography is so dependent on well-controlled and exposed lighting. Using shadows and reflections to convey information and feelings about your subject is vital because there is no color to assist you with this.
Still life photography gives you more control over your subject and lighting than almost any other genre of photography. You don’t need a studio full of expensive equipment either. With a few table lamps and some stationery supplies, you can achieve almost any lighting style.
A healthy imagination and as much time as you’d like to commit will start you off well. You don’t have to worry about the weather. If it’s sunny or cloudy is of little consequence. You can manage and manipulate your subject as much as you like and it will never give you any attitude. It’ll never move when you least expect it to either.
Removing these challenges from photography allows you to enjoy experimenting and learning to work in monochrome and create beautiful pictures of any items you like.
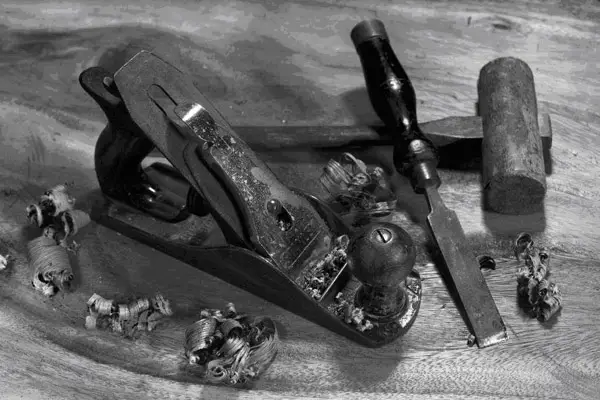
Balanced lighting using two lamps and ambient light. A flag blocks the ambient light from directly affecting the objects and reduces the reflection on the front plate of the wood plane. © Kevin Landwer-Johan
7 Tips to Take Stunning Black and White Still Life Photography
Here are seven tips I believe will help you take amazing black and white pictures of still life subjects.
1.Find Inspiration
Coming up with a stellar idea for a photo can be challenging. Especially if it’s the first time you have ventured to explore a new genre. Every creative person struggles at times to know where to start.
Finding inspiration is as quick as a Google search. Jump online to discover how the masters have photographed their favorite still life subjects in monochrome. Learning from the best is a fabulous way to start something new.
I love the quote from Picasso, one of the greatest artists ever, “good artists borrow, great artists steal.” Don’t be shy to glean ideas from others, particularly those with experience and success.
I admire the still life photographs of American photographer Irving Penn. He photographed people predominantly, but he’s also known for his wonderful still life pictures. At times photographing single objects. Other times focusing on eclectic collections as studies in texture, shape, and shadow. Edward Weston and Man Ray are two other classic photographers who worked extensively with still life subjects.
Don’t confine finding inspiration to looking at the works of photographers. Painters have for centuries arranged fruit and flowers in as many ways as can be imagined. Flick through some magazines. Watch a movie. Listen to some of your favorite music. You can find inspiration for photography anywhere at all if you’re open to it.
If you do have a specific purpose for your still life photographs in mind, look at the photos of those who work in a similar style. Maybe you want to photograph products you’ll sell on your website. Then look at other similar websites to see the quality of photos they display. Instagram and Pinterest are deep resources when you’re looking to discover how other photographers have already tackled a subject.
2.Set Up Your Workspace Well
Once you know what you want to photograph, you’ll need a suitable space to work in.
There’s no such thing as a studio that’s too big. But most of us can’t live by this ideal. You must pick a spot to set up your subject so you can work freely.
If you want to photograph your car or your pet rock you’ll need a different size space to work in (depending on the size of your rock.)
A location that’s a little out of the normal traffic flow in a house is best when you’re working from home. The dinner table may seem like an excellent site to begin arranging your objects until it’s time to eat. Working on a tabletop is a good option, but it’s best to use one where you won’t be disturbed. Being free to take your time is one of the joys of still life photography.
A solid surface is also advisable. Setting up an intricate collection of carefully positioned objects on an unstable surface will lead to disaster when a curious toddler or dog comes along.
If you’re relying on natural light for your still life photos, you’ll want to be near a door or window. The light will vary during the day depending on the position of the sun. Think about whether you want direct sunlight or softer, diffused light.
Access to your tabletop is important. If the table is in the middle of the room you can move around it easily. This makes it more convenient to position lights of reflectors where you need them to be. It also allows you to arrange the items you’re photographing from any angle.
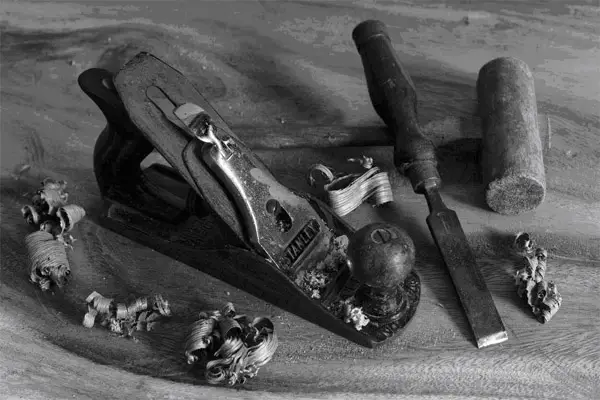
Ambient lighting only coming from an open door to the right. Note the reflection on the wood plane front plate. © Kevin Landwer-Johan
3. Experiment with Lighting Your Still Life Arrangement
Lighting is one of the key aspects of a good black and white photograph. With still life photography, you have a lot of flexibility about how to light it.
Decide how you want your pictures to look. Do you want high or low contrast? With high contrast, you will have to choose to expose either for the highlights or the shadows. When you expose for the highlights, the shadow areas will be very dark. Exposing for the shadows will mean you lose detail in the highlights. The lower the level of contrast, the more evenly detail will be seen in both the shadows and the lighter areas.
You can add light using flash or continuous electric light. This can be from photographic studio lighting or a regular tabletop lamp. You can work with a single light or as many as you have available.
Natural light is also great to work with, but not so adjustable. Working near a large window or a door will provide lovely light for your pictures, but you cannot move it around like you can with artificial lighting.
Reflectors and Flags
Using reflectors and flags is an important part of lighting a still life photo well. You can use any white, silver, or light-colored surface to reflect light into your subject. A piece of white card or paper is often sufficient.
Experiment with where you place your reflector. Having it opposite from the main light source produces a different effect than having it closer to the light. As you hold your reflector in place, alter the angle of it in relation to the light source, and watch what happens to the light on your subject.
Flags are flat pieces of card or board. They are usually black so they don’t reflect light. These are used to block light when too much is affecting your subject from a particular angle. If you’re working with natural light and low powered lamps, you can use flags to block out some of the daylight so it balances more with the electric light.

Behind the scenes set up showing two lamps and a flag. © Kevin Landwer-Johan
4. Control the Shadows and Reflections
Where you position your lights controls how the shadows and reflections appear in your set up. With monochrome, there’s more emphasis on shadows and reflections and how they relate to the elements in your photos.
A relatively small, bright light source produces harder-edged shadows than a larger, diffused light will. Moving your light closer to your subject will also soften the shadow.
Light reflects off a flat surface at the same angle it hits it at. Changing the position of the light alters the look of a reflection off shiny things you are photographing. Moving shiny subjects so the angle changes also alters the appearance of the reflection. Moving your camera can mean you either see or don’t see a reflection too.
Flags can be used to block light or manipulate reflection off shiny surfaces you’re photographing. I used a flag in some of the pictures I took for this article to reduce the reflection of the front plate of the wood plane.
Moving your lights and subjects around changes the way they interact with the light and reflect it into your camera lens. If you’re seeing a bright reflection you don’t like, moving the object, the light source, or your camera will alter how the reflection appears in your photo.
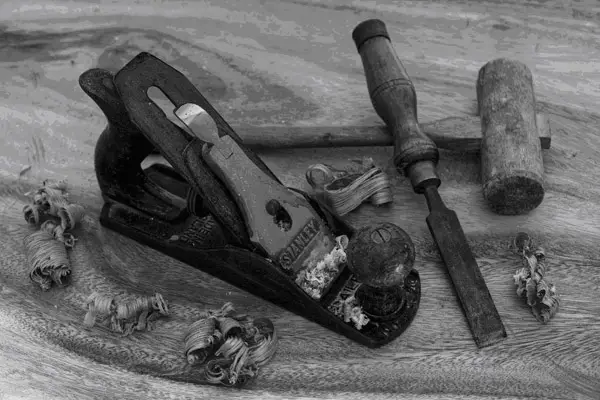
Flag blocking light coming directly from the open door. Very flat lighting and minimal shadows. © Kevin Landwer-Johan
5.Careful Placement of Items for Strong Composition
Composing a still life for a monochrome picture you can arrange your subjects endlessly. Look at how the objects appear in relation to each other. As you move them around, pay attention to the shadows they are casting as these are an integral part of your black and white photograph.
Because you can position elements however you like, you can apply various rules of composition as you wish. Think about the rules of:
Any of these can be used in combination to create a strong and interesting composition.
Don’t only photograph the first set up you arrange. Experiment. Use different focal length lenses. Move stuff around. Change your camera angle. The first photos you take will likely not be the best ones.
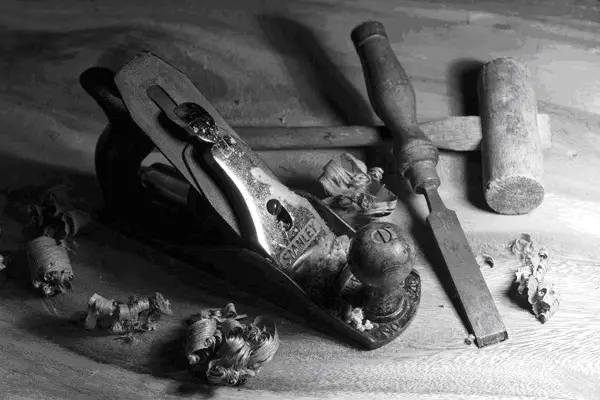
One lamp placed low on the right side of the still life arrangement casts a strong shadow. Harsh directional light and strong shadows. © Kevin Landwer-Johan
6. Manage the Depth of Field
How much of your still life arrangement do you want to have in focus? Your choice of aperture setting, lens, and camera placement will affect the depth of field.
Using a shorter lens (lower mm) and a higher f-stop number you’ll get more of your still life in focus. Moving your camera further back from your tabletop will get even more in focus.
The closer you focus, the less depth of field you will see. Using a longer lens and a wider aperture setting will also reduce the depth of field.
If you have a tripod, this will allow you to more easily manage your depth of field when you want more in focus. With your camera firmly mounted, you can use a narrow aperture and slower shutter speed setting without getting camera shake. If you’re working with multiple studio strobes this is not an issue because you’ll have ample light.
7.Post Process for Perfection
What you do with your pictures once you have taken them is important.
To render your still life pictures in black and white you can simply desaturate them (in Photoshop etc). This is easy but not the best option. By just removing the color your images may appear flat and dull.
Each color renders differently in black and white. In many image editing programs such as Adobe Lightroom and Photoshop, you’ll be able to control the value of how each color renders as a monochrome. Controlling this, you can make each color lighter or darker as you like. For a subtle black and white effect, or for getting a classic film look, you can also use these vintage presets for Lightroom.
There are also many apps available that will render color pictures as black and white. They offer a variety of styles you can choose from. Picking one that best suits the feeling you want to convey with your photo will make it more compelling.
Post-processing in black and white is a huge topic on its own. Here’s an educational video from the team at B&H Photo Video that provides plenty of detail:
Conclusion
Black and white still life photography is fun. You have a lot of control because your subject and lighting can usually be easily manipulated to obtain the look and feel you want.
The final step will be to print your lovely black and white still life images, so here’s an article about choosing the best printer for the job.


1 comment