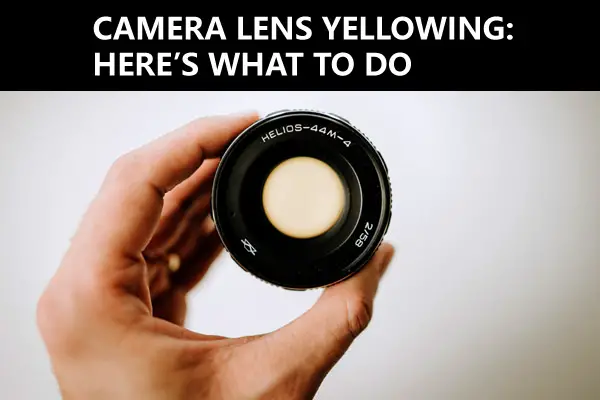
If you use older camera lenses for your photography you might have run into the problem of lens yellowing. Don’t worry this isn’t an irreversible problem and we can help you to fix it. It’s much easier than you might expect.
Before fixing the problem it’s sometimes worth understanding why this is happening.
The reason for the yellowing is its caused by the Thorium used within the glass which can turn yellow over time. What is thorium you ask? Thorium is a slightly radioactive metal that is used to help light pass through the lens more quickly. But over time it can cause the glass to turn yellow.
Radioactive lenses
Upon hearing the news that your camera lenses are radioactive you might think the solution to the problem is to get rid of them. Quickly throw them out and get these radioactive monstrosities as far away from you as possible rather than carrying them around on your hip and holding them up to your eye.
First, remember that I did say slightly radioactive – the emphasis here is very much on the word slightly. Thorium is a naturally occurring metal that is (here’s that word again) slightly radioactive. Found in small amounts of rocks or soils there’s really nothing to worry about.
To give it some context the measurement for radiation is MREM. The US Nuclear Regulatory Commision (NRC) guidelines suggest that the average person should limit their annual exposure to 50,000 MREM. A camera lens releases approximately 0.01 MREM per hour. There literally aren’t enough hours in the year for your one or two vintage lenses to hurt you. Even if you carried them around with you all day everyday. They’re safe.
The moral of the story is that you don’t need to be afraid of all things that contain radiation. Bananas, brazil nuts contain levels of radiation and you eat those. Fluorescent lights and granite work tops also contain radiation. Even things designed to keep us safe, such as smoke detectors can sometimes contain radiation. Radiation is everywhere, it’s just not always dangerous.
How Do You Fix The Yellow Tint?
So now that you know why your lenses are turning yellow and you’re comfortable in the knowledge that they aren’t going to harm you let’s get back to the subject of your tinted glass and start working on what to do if you have yellow Lenses.
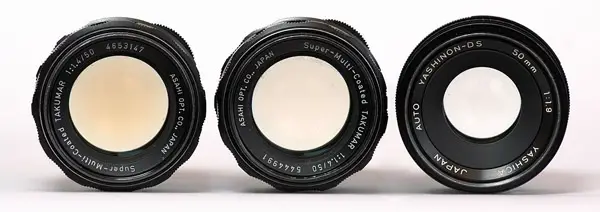
Photo from Wikimedia Commons
Live With It
The first option is to live with it. The chances are that if you have one or more vintage lenses, you’re probably interested in experimenting with the art of photography. If that’s the case living with this yellow tint could be a fun option for you.
The yellow glass will create a vintage feel to your images with a war yellow look. When photographing outside in daylight you’ll often find the light to be quite blue so the yellow tint on your lens will offer some balance to that. You’ll have a permanent golden hour filter on your camera. What’s more, the yellow lenses do look different,they could be a good talking point at your camera club.
The problem with doing nothing is that it does limit you because there will be times when you don’t want the extra yellow colors to your images. So if this is your one and only lens, leaving it probably isn’t a good Idea.
The other problem with leaving it is that you’re limiting the amount of light passing through the glass which defeats the purpose of having the thorium in the lens in the first place. The reason for having thorium is to improve the quality of light passing through the lens by allowing it to pass through the glass more quickly. The yellow tint inhibits the ability for light to pass through the lens meaning that you lose an F-Stop or two. Suddenly a F4 becomes more like F5.6.
Here is a video on the subject:
Color Correct
There’s no doubt that whatever the reason for choosing the ‘live with it’ approach to dealing with the problem, there’s an element of laziness involved with it. A similarly relaxed approach is to fix the color in post. Rather than making any roads to fixing the lens you could simply fix the color in Adobe Lightroom or whatever editing software you use. Adjust the white balance, problem solved.
The reality is that if you do use a program like Lightroom to edit your pictures then you’re probably going to work on the colors of your images anyway so why not just fix the yellow.
This could be a good short term fix but this will probably become tiresome after a while and if this option is chosen for ease, having to address this white balance issue on every image might become a real nuisance. Besides, you’ll still have the same problem as earlier with the quality of light being recorded by your camera and the trick to being a better photographer is getting it right in camera.
Of course photographers edit and color grade their images but it’s better to get them right from the start rather than relying on the edit to make things right. Trust me the quality of your images will be so much better with this approach.
UV Light
For a real fix to the problem of lens yellowing, UV light is most probably the answer you need. There are a few dos and don’ts to be careful of so let’s start with some of the things to be wary of before moving onto some bonafide solutions. Hopefully this will ensure that you don’t make any silly and potentially damaging mistakes.
Free UV Light
There’s a cheap free source of UV light that you can access on a daily basis, just look up. The sun. The sun is your answer and because of the availability of this regular and free light source you will find a lot of people recommending that you leave your yellow lens in the window for a while to fix the problem.
By a while they mean a month. That’s right, stick your lens in the window for four weeks and the lens will be cured of its yellow tinting. Yes that will work but by solving one problem you might have the unfortunate side effect of creating another.
The heat generated from the sun and magnified by the glass from the windows is far too hot for your camera lens to be comfortable. This intense heat is likely to cause other forms of damage that can’t be ignored or easily fixed in post.
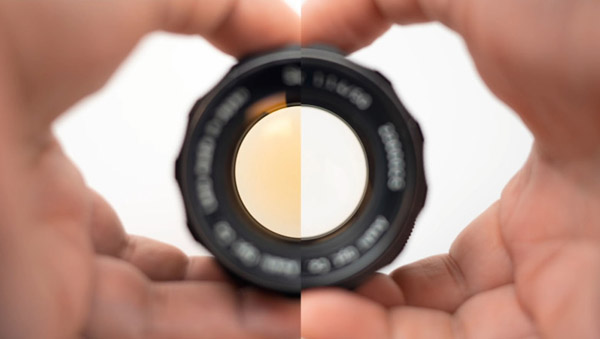
Image from Mathieu Stern
The risk is that the heat will damage the glue within the lens which will obviously affect the build integrity. Another issue is that the heat will soften some of the grease used within the lens mechanism and this will negatively affect the lens. So rather than a yellow picture you have a hazy photograph instead, caused by all the grease.
Basic rule for fixing yellow lenses and all photography in general: don’t leave your lens under intense heat.
There’s a theme developing here, with the lesson being don’t take too many shortcuts. From the basic do nothing concept of simply plonking your lens in a window you’ll find that you haven’t really fixed anything.
Paid UV Light
With a little more effort you could buy yourself a UV light. I know what you’re thinking, but before you pack your camera kit into a bag with your Speedos and rush off to the tanning salon, there’s an easier way.
By going to the effort of spending a little bit of money to purchase your own UV light you can fix the problem. And unlike relying on a burning ball in the sky, your fix won’t take three or four weeks it will only take a few days. Although much like the issue with the sun, you will need to be careful about heat damage.
Old fashioned UV bulbs produce an incredible amount of heat so you’ll need to be careful about how close your lens is positioned to the light. If possible try to find an LED UV light which won’t produce the same level of heat and will be much kinder to your gear. Something like this one.
There’s a top tip when it comes to repairing your lens with a UV light. The trick is also to line one side of your lens with foil to maximize the amount of light passing through your lens. By having a UV lamp on one side of the glass and the foil on the other you will allow the light to bounce back through the light speeding up the process.
I have heard people use mirrors instead of tin foil but the benefit of using foil is that you can wrap it around the back to the lens tightly to avoid dust getting into the lens.
Conclusion
So my final piece of advice before you fix the yellow tint on your camera glass is to test it. Don’t rush off and fix your glass without first experiencing the results of shooting through your tinted lens. After all, the joy of photography comes from experimentation.
For an article on repairing camera lenses click this link.


2 comments