But black and white images can be very powerful. By eliminating color, black and white forces us to concentrate on other aspects of the photo. Textures. Lines. Something as simple as a surface receding into shadow becomes positively sensuous when care is taken in the conversion process. There are many techniques for converting a color image to black and white. The only consensus seems to be that simply converting to grayscale is the wrong way to do it.
Of course, many of you can opt to just let your camera do it for you. Many cameras have a black and white option which tells the camera to convert the color image captured by the camera into black and white for you. By all means, keep using that if you’re satisfied with the results. But I encourage you to try a few after-the-fact conversions yourself. You may be surprised.
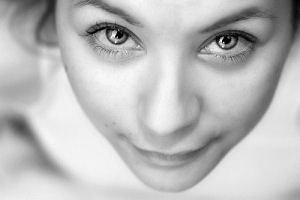
Black and white conversion via the channel mixer
What’s the benefit of capturing an image in color if you’re only going to convert it to black and white later? For starters, it gives you more options. You can always convert a color photo to black and white but it is exceedingly difficult to go the other way. But more importantly, when you capture an image in color you’re also capturing a lot more data. 24 bits per pixel compared to 8 bits per pixel in black and white. What does that mean in real terms? One of the biggest concerns converting to black and white is making sure you have nice, smooth tones throughout your image. Black and white/grayscale images only have 256 levels and if you aren’t careful you can easily create banding where the transition between tones isn’t smooth. Starting in color gives you more to work with so you can prevent that problem.
There are many methods for conversion to black and white. For the remainder of this article, for brevity, I’m going to say “Photoshop” but I mean it in the most generic way possible (like Band-Aid). Most image editing software has similar features and these tips aren’t restricted to Photoshop.
The simplest and least recommended method is to use the Grayscale or Desaturate function. What you typically end up with is a flat, boring image and no tone control. You might use this though as a last step to make sure your image truly has no color in it after you’ve done your real conversion. You get similar results by using the lightness channel after splitting your image using Lab Color mode (or HSL).
Black and white film shooters have long employed colored filters on their lenses to bring out details in different parts of a photo. You can simulate this effect in Photoshop by using two hue adjustment layers. Add two hue/saturation adjustment layers on top of your image. Set the very top layer saturation level to 0. In the second layer, use the hue slider to change the color of the “filter.” As you move the slider, notice how the character of the black and white image changes. What you are doing is controlling how the colors combine to create a grayscale value. Rather than a second hue/saturation layer, you could adjust the color balance to filter the conversion.
You can also do this using the Channel Mixer. The mixer lets you adjust the ratio of each of the color channels in an image. Open the Channel Mixer and click the Monochrome checkbox. Now adjust the sliders to achieve the desired effect. The sum of the sliders should equal 100% to retain your original brightness. When shooting portraits, I like to use more of the red channel and less green. This has the effect of smoothing out skin tones. When shooting landscapes, you may want to use more green. The blue channel typically contains the most noise. Lots of blue channel makes people look very strange, as well. Controlling three variables at once takes some practice to get a feel for it. Once you do, you’ll find that this is a very powerful conversion technique.
Once you’ve got the basic conversion done, you’ll want to adjust the contrast of the image and levels to make the most of the available tones. In most black and whites, you want deep, black shadows, bright whites, and smooth tones throughout. Be on the lookout for banding where there aren’t enough tones to make smooth transitions. Those spots can often be fixed by adjusting your conversion or curves/levels.
Finally, there are many plugins and specialized software for doing black and white conversions. Picasa, for example, has an easy to use black and white conversion tool that works a lot like the hue adjustment method above. But I’ve found that decent image editing software with a channel mixer is all I need.


Thanks for the writing about this — I can’t wait to try some of these techniques on my own photos.
I just wrote a similar tutorial that covers these same techniques a little more in depth. I agree. Channel mixer is amazing. Here is my tutorial.
http://freedp.blogspot.com/2007/03/tutorial-converting-color-image-into.html