How many of you love wasting hours of time making the same basic edits to a lot of photos?
Anyone? No? Well, that’s understandable. None of us like doing menial repetitive tasks and it’s no different when editing images — even for those of us who enjoy the editing process.
The good news is that Lightroom has a handy tool that you can use to take care of the menial stuff and speed up your workflow. It is called presets, which are an established set of edits that you can apply to a photo in one click.
The software allows you to create your own or you can buy presets from other creatives who have found combinations that offer either a certain style of natural editing or create cool effects you can add to your photos.
Intrigued? Let’s find out how to use these game- changing Lightroom presets…
The Case for Using Lightroom Presets
As you delve deeper into photography, you will develop your own unique style. For example, some photographers love the light and airy look, others prefer a more moody, darker look. Some love bright, bold colors, whereas others love a more pastel look.
We also see certain looks or styles trending among the general population. Professional photographers may have clients request a certain look, or the clients themselves may shop photographers by looking for one whose portfolio matches up with the look they want.
What does all this mean?
It means that when editing images, there may be several of the same basic edits that you make to a lot of photos. Instead of adding the edits one by one to each photo, which is both time-consuming and boring, you can use presets to do it quickly.
Presets can be added to one photo at a time or to hundreds of photos at once. You can imagine how much time this would save a wedding photographer, for example.
Types of Presets
There are a plethora of presets available for free or for sale on the Internet. Feel free to take a look at our Lightroom presets and those of our partners. Many presets are designed for a natural look and others are designed to add cool effects. Some of the many styles of presets you can find include:
- A soft, romantic style
- High key
- High contrast
- Enhanced sunsets
- An old-time feel
- A golden glow
- A cinematic feel
- Film camera feel
- Classic black and white
- Landscape presets
- Cityscape presets
- HDR presets
And so much more. The creativity out there is virtually endless!
Installing Lightroom Presets
Whether you purchase a set of presets or download a free batch, the installation process is the same. Follow these steps to install presets in Lightroom Classic v 9.2:
- Open your download and unzip the zip file
- Save the unzipped file somewhere that you can access it easily
- Open Lightroom and go to to the develop module
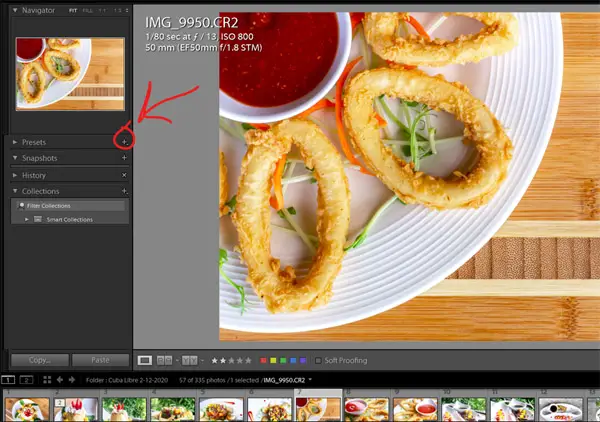
- In the left module panel, you’ll see a menu called “Presets”. Don’t see the left module panel? Try hitting F7 or clicking the small arrow at the far left of the screen. If that doesn’t work, go to the menu bar and navigate to Window > Panels. Then click on Show Left Module Panels to enable it.
- Click on the plus sign the right of the word “Presets”
- Click on “Import Presets” in the dropdown menu that appears
- In the window that opens, navigate to wherever you saved the unzipped presets file, select it, and click “import”
Voila! That wasn’t too difficult!
In some versions of Lightroom, you may not see the plus sign in the “Presets” tab. In that case, here’s how to do it:
- Open your download and unzip the zip file
- Save the unzipped file somewhere that you can access it easily
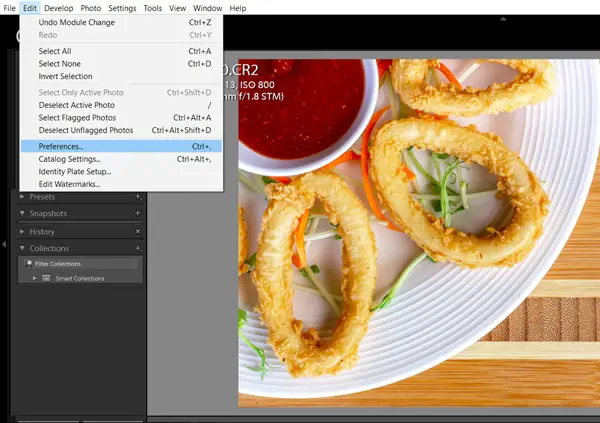
- Open Lightroom and go to “Edit” in the menu bar
- Select “Preferences”
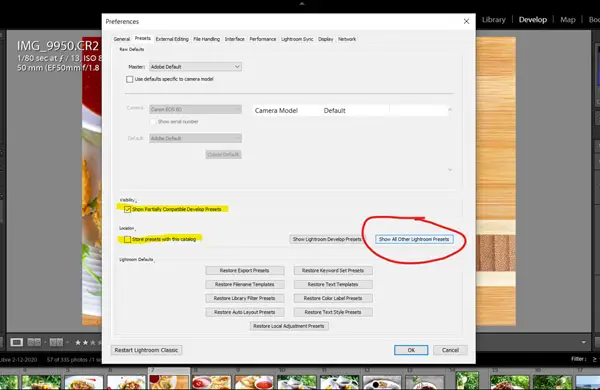
- Select the “Presets” tab in the window that appears
- Make sure “Show Partially Compatible Develop Presets” is checked and “Store presets with this catalog” is unchecked
- Click on “Show All Other Lightroom Presets”
- Double-click “Lightroom”
- Double-click “Develop Presets”
- Copy your new presets into this folder
Using Lightroom Presets
Once you’ve got your presets installed, using them is quite simple. Open the image you want to use and make sure you’re in the develop module. In the editing panel (usually on the left), you’ll see the “Presets” tab with a list of presets underneath it. If you don’t see the list, click the folder triangle next to “Presets” and the list should appear below it.
To apply a preset, simply click on the one you want and it will be applied to the image you have selected. If you want to see how a preset will look before applying it, simply hover over the name and a preview will appear over the image.
Applying Presets to Multiple Images
If you want to apply a preset to multiple images, there are a couple of ways to do it. The first is quicker and useful for applying a basic preset to an entire shoot or group of photos.
In the Library module, choose the images you want to apply the preset to. If all the images you want to use are lined up in a row, hold down the shift key and click the first and last image to select them all. If you want to pick and choose, hold down Ctrl or Cmd and individually select the images you want.
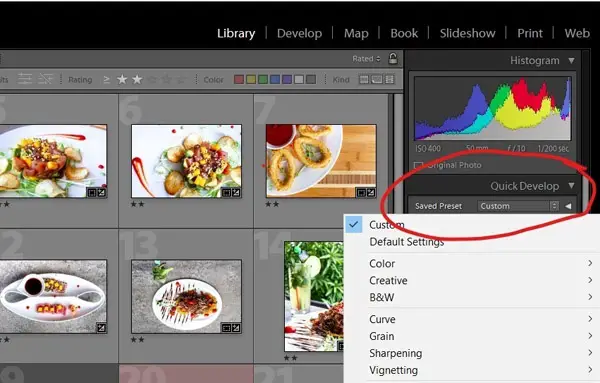
Go to the Quick Develop panel where you’ll see “Saved Preset” with a dropdown menu next to it. Click in the box and your list of presets will appear. Select the one you want and the preset is applied to all the selected photos. Bam! Done.
The second way to do it is a little clunkier, but useful if you want to tweak the preset slightly for this shoot without creating a whole new preset. For example, you may have a go-to preset that won’t quite work with the white balance for the shoot you’re working on.
In the Develop module, apply the preset to your first image and tweak the white balance to your liking (and whatever else you need to tweak). Then, using shift or Ctrl/Cmd, select the other photos you want to work with.
Make sure that you first select the image with the preset already applied and adjusted the way you want before selecting the rest of the photos. Click sync.
A window opens up allowing you to pick and choose which settings are applied to all the photos. Leave all the boxes checked if you want to apply everything. Uncheck any boxes that you don’t want to apply. Common exclusion examples are things like crop photo and local adjustments. Click “Synchronize”. Done.
Tweaking Images
A preset is a great starting point, but often individual images will need a few personalized tweaks before they’re done. However, applying the preset a whole batch speeds up your workflow tremendously.
Now, all you have to do is go through and adjust the exposure here, tweak the contrast there, and fix the white balance in that one picture where the lighting was weird and threw off your groove. You can imagine how much time this saves, particularly when you’re dealing with a lot of images with similar settings in the same environment, like at an event.
Making Lightroom Presets
There are tons of Lightroom presets out there to choose from. These are great when you’re getting started or if you find a style you particularly love. To save your favorite settings, you can also create your own custom presets.
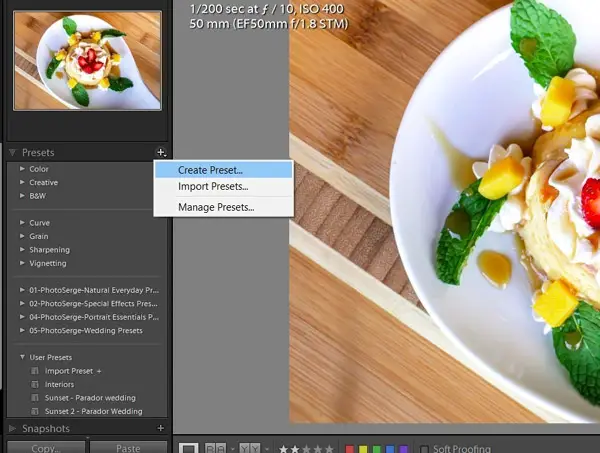
Apply the settings to an image that you wish to make into a preset. Then, there are a couple of ways you can save it. Either go to “Develop” in the menu bar and select “New Preset”. Or click on the plus sign in the “Presets” panel and select “Create Preset.” Or hit Ctrl + Shift + N on a PC or Cmd + Shift+ N on a Mac.
Any of these methods will open the “New Develop Preset” window. Here, you can give your preset a name and choose which group to save it to.
Flowery/artistic names are fun but can be confusing unless you have an exceptional memory. A name that briefly describes what the preset does is a bit more practical. So choose something like “high key B&W” or “soft, romantic edit.”
You can also choose which settings are saved in the preset. The default is to save all the settings. However, this means that when you use the preset, it will overwrite all settings on the photo. A better option is to select only those settings that you’ve used to create the preset.
For example, say you want to create a quick preset for noise reduction and lens corrections. Select only those boxes when saving your preset. Or perhaps your preset only affects the white and black clipping and contrast so you can select only those boxes. Then click “Create.”
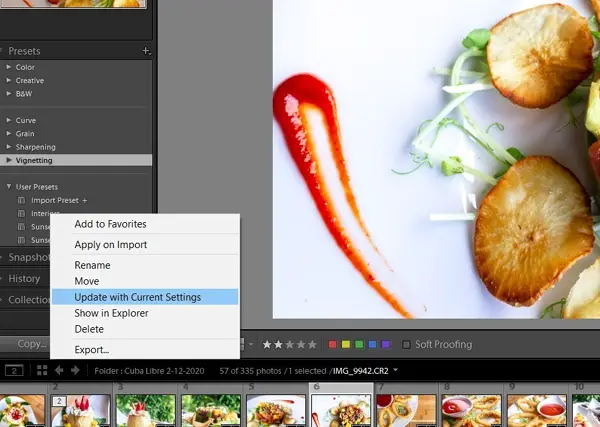
What if you want to tweak your preset a little after you’ve created it? Do you have to start over with a whole new preset? Nope. Simply apply the changes you would like to make to your preset. Then, right-click on the preset to open the dropdown menu. Select “Update with Current Settings.”
Alternatively, if you want to save slightly different versions of a preset you can save your changes as a new preset. Store it with the original preset and name it something that reminds you of the changes you made.
For example, if you named the original preset “Sunset Colors”, you can name the new one “Sunset Colors – Dark Sky” to reflect a preset with a graduated filter darkening down the sky.
For those of you who are super visual learners check out this great video walking you through the process step-by-step.
Stacking Presets
Keep in mind that Lightroom allows you to stack presets. This means that settings will always default to the last preset applied. But if the last preset doesn’t affect a particular setting, that setting will be preserved from the previous preset.
Beware of this if you’re going through and clicking on presets to see how they look. You’ll need to remove the currently applied preset to put on a new one from scratch. Otherwise, settings from the previously applied preset may be preserved along with the new preset.
When you buy presets, you can’t control how the creator saved them. But when you’re creating your own, you can. Keep the ability to stack presets in mind as you’re creating your favorite looks.
This makes saving your presets correctly when you create them even more important. As we mentioned in the previous section, you can choose which settings to save and affect with a particular preset. If you don’t do this, you won’t be able to stack presets because each new one you apply will completely overwrite the settings applied by the last one.
Organizing Your Presets
As you play with creating presets (or download new ones to play with) you may develop quite a collection. The whole point of a preset is to save you time. If you end up wasting a bunch of time hunting through all your presets for the one you want, you’ve defeated your purpose.
Lightroom, however, gives you a handy way to organize them.
You can create folders that will appear in the presets panel. Once you get your folders set up, you can easily drag and drop the presets into the folder you want to use.
To set up the folders, right-click in the presets panel and choose “New Folder” from the dropdown menu. Name and save the folder.
If this method doesn’t work for you, you can also try the following.
- Click the + sign in the Presets tab
- Select “Create Preset”
- At the top, directly under the preset name, there is a dropdown menu called “Group”
- Click on that and you’ll see a list of your current preset folders
- To create a new one, choose “New Group” and give it a name
- Click “Create”
When naming preset folders, as when naming presets, stick with something sensible. For example, create a folder called “Golden Hour” or “Sunset” and put all your golden hour/sunset looks in it.
Alternatively, you may find that you develop a few favorite presets that you use frequently. While they may not have much to do with each other, you can group them in a folder called “Go-To Looks” or something to have them all together in one handy place.
Hiding Presets
You can also “hide” presets to keep your workspace less cluttered. Right-click in the presets panel and choose “Manage Presets.” A window will appear with all your preset folders with checkboxes next to them. Folders with checked boxes will appear in the presets tab. Uncheck the box next to any of the folders that you don’t want to appear.
This useful if you have hundreds of presets to sort through. When you’re working on portraits, you can have only the preset folders that are useful for portraits visible. When you switch to working on landscape photos, you can switch your preset folders as well.
It simply cuts down on scrolling time as you’re looking through your presets.
Sharing Presets
What if you develop an awesome preset that you want to share with your friends (or sell for the big bucks)?
Thankfully, Lightroom makes the process pretty simple.
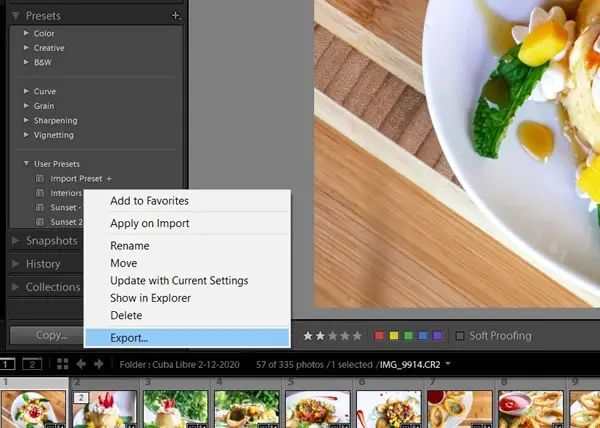
- Right-click on the preset you want to share
- Choose “Export” from the dropdown menu that appears
- When the OS save window appears, choose where you want to save the preset and click “Save”
You can also export groups of presets if you want to export several at once.
Even if you don’t want to share presets with other people, it’s a good idea to use this technique to backup your presets outside of Lightroom.
Questions About How to Use Lightroom Presets?
As you can see, Lightroom presets are a convenient way to speed up your workflow. The high degree of customization allows you to set up your presets in a way that will work for you whether you’re a wedding photographer dealing with lots of people or primarily photograph insects and flowers on a macro level.
We hope this guide has given you a thorough understanding of how to use Lightroom presets. If you’re still unsure or have a question, feel free to drop us a comment! We love to hear from our readers and are happy to help any way that we can.
Want to learn more about how to streamline this powerful editing software? Check out these 10 plugins for Lightroom that will help you produce gorgeous photos you will get excited about!


4 comments