The breathtaking landscape before you is just begging to be photographed. The only problem is that you don’t know how to do it. You try taking a few images, but upon reviewing them your disappointment sinks in.
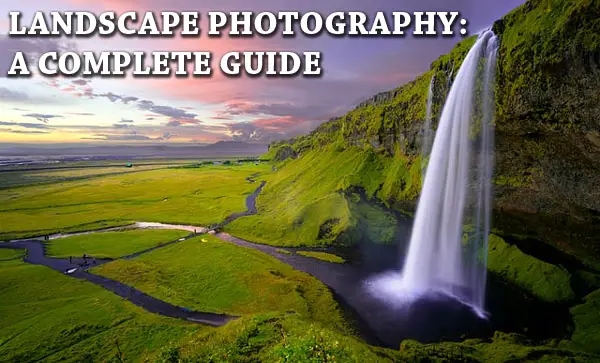
They don’t hold a candle to the real thing — and they certainly don’t look like those gorgeous landscape images that show up in your feed on Instagram.
What are you missing?
Find out here with this comprehensive guide to landscape photography. Once we’re done with you, those ho-hum images you took won’t look a thing like the dazzling ones you get on your next outing…
Camera Settings
If you haven’t yet ventured into manual mode on your camera, now is the time. You can take some okay images in automatic mode, but if you want really stunning landscape images you’re going to need to head out to the deep end.
Don’t worry, getting the hang of manual mode isn’t as difficult as you might think. The main thing is to understand the exposure triangle.
The Exposure Triangle
As the name suggests, there are three settings the create the exposure triangle. Each one affects how much light hits the camera’s sensor and thus the exposure of the image. However, each one affects the image differently and you need to understand how they work to choose the correct settings.
Opening up your aperture brightens an image, but narrows the depth of field, throwing a portion of your photo out of focus. Bumping up your ISO creates a brighter image, but can introduce grain. And finally, slowing down your shutter speed also brightens the image, but can introduce motion blur.
Have we lost you? Don’t worry, we’re going to explain it all right here.
Aperture
Portrait photographers often shoot “wide open” to create bokeh in the background around their subject. This means that the aperture is open as wide as the lens will allow. However, landscape photographers generally want the entire image to be in focus. Thus, most of the time you’ll be shooting with a small aperture.
How do you choose the right aperture?
Aperture is written as f/x where x is the aperture’s size. For example, f/2.8 or f/8. The tricky part is that it works like fractions, the bigger the number the smaller the aperture.
Have you ever baked a cake? 1/2 of a cup is physically bigger than 1/4 of a cup even though 4 is larger than 2. Thus, from our earlier example, f/8 is a smaller aperture than f/2.8.
In general, when shooting landscape photography, you want to use f/8 or f/10 and smaller.
Why?
Aperture controls your depth of field, which you can think of as how many layers of your image is in focus. For example, in the photo below there are some docks and boats in the foreground, the boats in the background are physically a long way away. In order to have all the boats in focus, you must choose a small aperture (f/11, f/16, etc.)
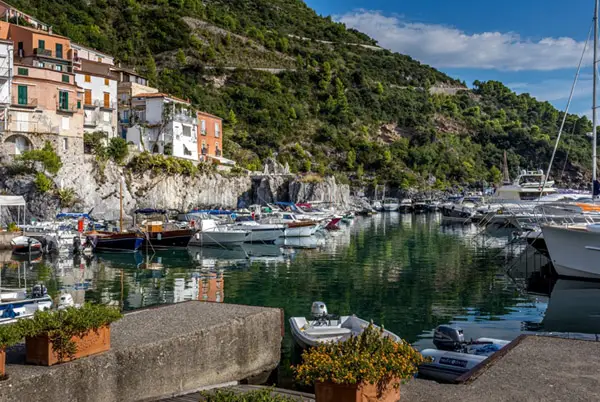
Photo Credit – Cara Koch
The minimum and maximum aperture that you can use depends on your lens. For example, the inexpensive and easily available Canon EF 50mm f/1.8 STM Lens offers an aperture range of f/2.8 to f/22.
ISO
ISO refers to your camera’s sensitivity to available light. A lower ISO means that your camera is less sensitive to light and a higher number increases its sensitivity. Unfortunately, a higher number also introduces noise into the photo. How much depends on the quality of the camera.
Higher-end cameras can handle 1200 ISO or even more without affecting the quality of the image. However, with cameras on the lower end of the spectrum, you might start seeing a negative effect at around 400.
When photographing landscapes, you should generally use the lowest ISO possible, 100 or 200 on most cameras. But what about when it’s too dark? That’s why you need a tripod. A tripod allows you to slow down the shutter speed to allow more light into the camera without compromising the quality of the image.
Let’s talk about that next.
Shutter speed
Shutter speed is how fast the shutter physically flicks open and shut when the camera takes the image. The slower the shutter speed, the longer it takes for the shutter to open and close. This allows more light into the camera and brightens the image. A faster shutter speed allows in less light and takes a darker image.
Like aperture, shutter speed is written as a fraction, but it’s a little less confusing. It’s written as 1/x where x is the varying speed.
Bigger numbers mean a faster shutter speed. For example, 1/500 is faster than 1/250. This is because it literally represents how quickly the shutter clicks. 1/500 is 1/500th of a second, so the bigger the number the smaller the amount of time, which means the faster your shutter speed.
Clear as mud?
Shutter speed is very important in landscape photography. To avoid grain you want your ISO to stay at 100 or 200, and to keep the entire scene in focus you want a small aperture. Thus, shutter speed gives you a little bit of room to play to get the perfect exposure.
This works because generally in landscape photography your subject isn’t moving. However, keep in mind that wind blowing the trees or something similar can be blurred if your shutter speed is too slow.
Alternatively, you can use slow shutter speed to create cool effects, such as with moving water. This is called long exposure photography and we’ll explain more about this technique later on.
Raw vs JPEG
Depending on where you are on your photography journey, you may not have shot images in RAW. Again, if you haven’t started, now is the time.
People like shooting in JPEG because the files are smaller (don’t need as much space to store them) and most cameras give the images basic automatic post-processing so the photographer doesn’t have to. This is why JPEG images look better in-camera than raw images typically do. This sometimes confuses beginner photographers.
However, if you want stunning landscape images you need to learn at least something about post-processing and you need to shoot in RAW.
RAW files don’t apply any automatic adjustments, meaning the image is a little more flat and the colors might not be as bright in the camera. They are also larger because they retain much more information about the scene in the image. This is what you want.
For example, check out the photo below. The first image is the RAW file straight out of the camera. See how the sky and the top of the building are too bright and the stairs and alleyway are too dark? The second image is the same image after it was edited. The sky is much more appealing and you can see up the stairs
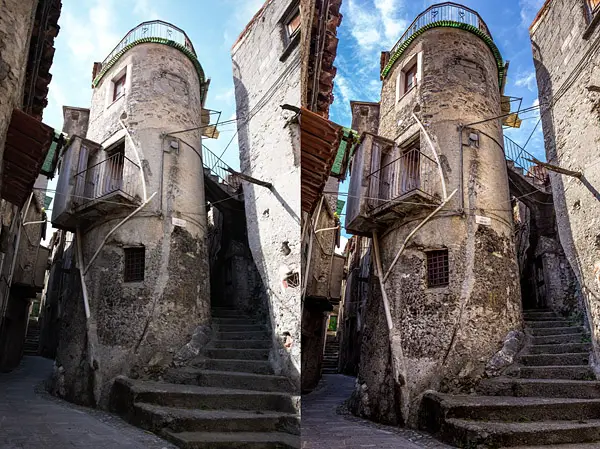
Photo Credit: Cara Koch
Without the RAW file, you wouldn’t be able to pull the detail back out of the sky and balance the image. You might wonder if you can just darken the exposure to keep the sky. The problem is that you’ll lose details in a too-dark foreground. It’s also important to note, RAW files give you more leeway to fix them if you make a mistake.
Equipment You’ll Need
Okay, now that we got camera settings out of the way, whats the next thing you need to take gorgeous landscape images?
You need some basic equipment like a tripod, a quality lens, and a set of filters.
Tripod
We’ve already talked a little bit about why shutter speed is important. Landscape photographers sometimes use shutter speeds so slow that even the movement of their breath can blur the image. You can imagine what happens when simply holding the camera freehand.
Thus, a quality tripod is a great investment. This will allow you to position your camera and take a photo without introducing lens shake and the resulting blur.
Having some way to click the shutter without touching the camera is also a good idea to avoid the slight shake from pressing the button. You can do this by connecting a camera with Wi-Fi to your phone with an app or getting a remote trigger like this one.
The tripod should be sturdy enough to hold your camera safely and take a bit of abuse since youĺl be traveling with it. It should also be lightweight and easy to set up with several options for camera placement so you can get the angles you want.
For casual landscape photographers, this is a good budget option. If you want something a little more sturdy that can handle your heavy DSLR, check out this one.
What Lens to Use
Now to the lens, arguably the most important piece of equipment. You can take landscape photos with something simple like the nifty fifty we mentioned earlier, but ideally, you want a nice wide-angle lens.
A wide-angle lens allows you to fully capture the scene in front of you. Lenses with a longer focal length, such as 85 mm, are too narrow, focusing on only a piece of the landscape. That’s fine for portrait photography where you have a specific subject, but in landscape images, the scene is broader. Aim for something 40mm or less.
Unfortunately, there aren’t any good budget options for wide-angle lenses. Find out why these lenses are so expensive here. There are wide-angle converters that can work, but the quality will suffer significantly. They are good for getting your feet wet, though, without spending a lot of money.
If you want to take awe-inspiring landscape images you need a quality wide-angle lens. This is a great option for Canon users. Images are sharp and the colors are amazing.
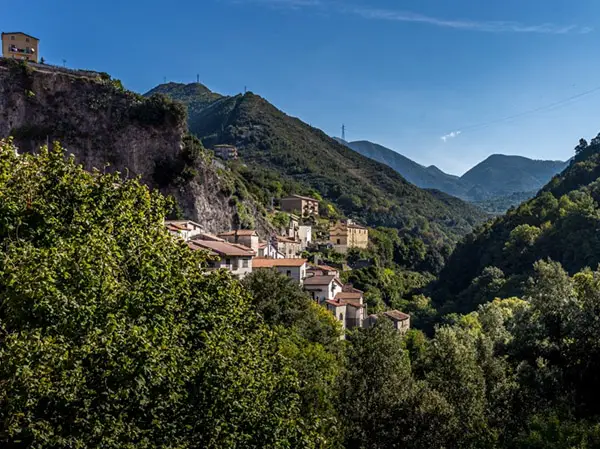
Photo Credit – Cara Koch
What Filters to Use
You don’t have to have filters for landscape photography, but they do come in quite handy.
The filter is another piece of glass that you put in front of your camera lens. There are a few different types that offer various effects.
Typically they screw onto the front of your lens so when buying filters you want to make sure that you get the correct size. Filter sizes are written as ⌀52mm, for example, and you can find your lens’ size written on the body.
Here are the basic types and their uses for landscape photographers.
Neutral Density Filters
Neutral density filters are dark, allowing photographers to photograph bright scenes with low shutter speeds without blowing out the image. This is important for long exposure photography which we’ll get to in a bit (we promise, it’s coming!)
Graduated Neutral Density Filters
Graduated neutral density filters are darker at the top and gradually become lighter towards the bottom. This is helpful for taking pictures when the sky is extremely bright but you don’t want to lose detail in the foreground. We talked a little about bringing the sky back in RAW images but using a graduated neutral density filter will allow you to take the image without losing any quality.
Polarizing Filters
Polarizing filters are helpful for removing glare and enhancing contrast in bright scenes. They are popular among landscape photographers who work with water like rivers and waterfalls.
UV Filters
UV filters don’t have a lot of impact on the image, but they are helpful for protecting your lens from scratches. This is important when you’re talking about protecting a $1000 lens.
We recommend this starter kit as an inexpensive way to start playing around with a few of these filters.
Tips and Tricks on Focusing
In landscape photography, for the most part, you want the entire scene in focus. To do that, you might think you can just set your aperture low, maybe f/16 or so, set the focus to infinity (landscapes are often in your lens’ infinity range anyway) and call it good. You could do this, and you will get a nice image a lot of times, but to be precise and get the sharpest images, you need to set the focus point.
Unfortunately, it isn’t always intuitive to choose a focus point in landscape photography. A portrait photographer has it easy, simply focus on the subject’s nearest eye. But what do you focus on in a landscape?
Let’s find out.
Focus on the Subject
Sometimes you’ll have a subject in your landscape scene. For example, in the photo below, the building ruins are the subject and the mountain scene in the background is supporting it. It doesn’t always matter that the entire scene isn’t in perfect focus, the main subject is and that’s what matters.
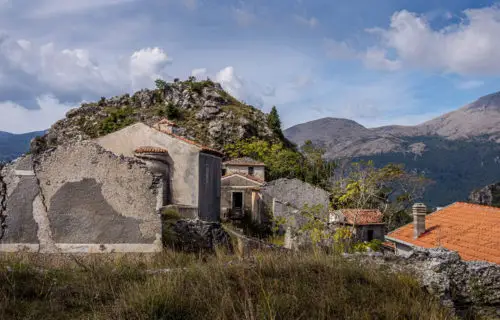
Photo Credit – Cara Koch
A Third of the Way into the Scene
But what if the entire landscape is your subject? There’s a whole mathematic concept built around hyperfocal distance that you can use to determine exactly where to put your focal point if you want to be overwhelmingly precise. Even if you’re not a mathematician, you can get smartphone apps to help you with the calculations.
However, the easy version is just to pick a spot about a third of the way into the scene, which is pretty close to where the hyperfocal distance will usually fall. This generally equates to about a third of the way up from the bottom of your viewfinder.
Use the Single Focus Mode
Your subject typically isn’t moving in landscape photography, so you should choose the single-shot focus mode. Camera brands use different names so look for something like “AF-S”, “Single Shot AF” or “One-Shot AF.”
In this mode, the camera won’t accommodate the focus for anything that is in motion like running water. This will keep your focus point where you want it.
However, if your subject is moving, such as an animal in your landscape scene, then you should switch to a continuous focus mode.
Use Back Button Focus
Having the automatic focus attached to the shutter button is fine for folks who just want to “snap shots” for their memory books. However, once you start getting into serious photography this feature is limiting.
Imagine this, you get everything set up and in focus and are waiting for the right moment to click the shutter. You may be waiting for the sun to go down or the wave to come crashing in at the perfect instant.
When it comes, you hit the button…and the camera starts searching for its focus point and you miss the shot you waited 10 minutes to take. Not ideal.
To avoid this, use back button focus. This is simply removing autofocus from the shutter button and assigning it to a button on the back of the camera instead. Check your camera manual for how to do this for your specific model.
If you’ve never used back button focus before, you don’t know what you’re missing out on. Try it. We promise you won’t be going back to the old way of doing things.
Photo Credit- Cara Koch
Choose the Aperture Setting with Care
You generally want a small aperture in landscape photography so that your entire scene is in focus. But that doesn’t mean that you should just crank your aperture to f/22 and start snapping photos.
Very small apertures, particularly on cameras with small sensors, cause diffraction which can mess with your image.
When everything in the scene is already in your lens’ infinity range (usually 20-30 feet away from you) your aperture doesn’t need to be super small to keep the whole image sharp. You can pick a value in your camera’s ideal aperture range which is going to be somewhere between f/7.1 and f/13 for most lenses and then pick a focus point.
If your scene includes objects very close to you and you don’t want to lose the sharpness in the distance, you can try a technique called focus stacking. This involves taking several shots of the same image (a tripod is essential!) using different focus points. Later, you put them together in Photoshop to create a photo with an impossible depth of field.
How to Take Panorama Shots
Even if you have a wide-angle lens, there are times it won’t be wide enough. Some sweeping landscapes are so vast the lens simply can’t take it all in. Additionally, you may want to cut out some of the sky and foreground and focus on whatever is in the middle part of the photo.
You can do this by trimming down a single photo or you can take several images and stitch them together later.
Check out French photographer Serge Ramelli’s simple tips here for lining up your panorama shots and putting them together in the computer.
Long Exposure Images
You take long exposure images by slowing down the shutter speed and introducing intentional blur into a photo. Examples of when you might use this are waterfalls (or any moving water), clouds, light trails in a night scene, or even the movement of stars.
You can add ethereal effects to your photos and add that extra little something that will make your photo a truly stunning image.
Slowing Down
The main thing with long exposure images is to slow down the shutter speed. The slower the speed, the stronger the effect, but there are certain things you want to balance.
For example, to photograph the movement of a waterfall, you could slow your speed down to a few seconds to get that beautiful silky effect in the water. Unfortunately, if there is vegetation as part of the scene, this will also end up blurry from the breeze gently tugging at the leaves.
To avoid this, you have to choose a shutter speed just slow enough to blur the water, but fast enough to freeze the leaves. The right speed will depend on the particular conditions so you’ll have to experiment. Another option is to take two images and blend them in post.
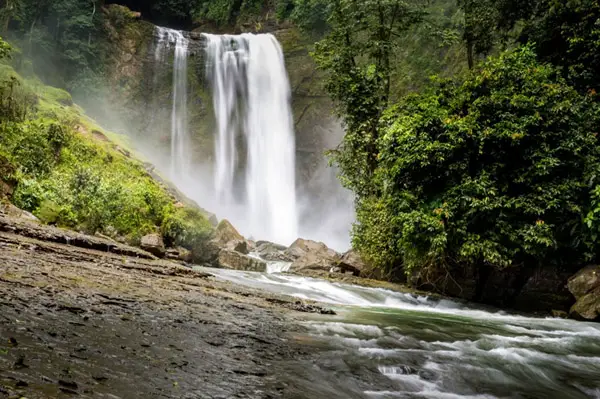
Photo Credit – Cara Koch
In another situation, like a seascape, you may want to slow the shutter down even more. To create a smooth, ethereal effect you might slow it down to a couple of minutes or more. Neutral density filters come in handy for darkening down your image so it doesn’t get blown out with the shutter open for so long.
For night photography, you can play around with even longer exposures. You might use a 30-minute shutter speed for a stunning capture of the stars!
Obviously, for this type of photography, a tripod is essential. You may even want a motorized sky tracker for your camera if you intend to do long exposures which moves your camera to take into account the rotation of our planet.
How to Find Interesting Landscapes
Okay, now that we’ve got the technical and equipment aspects out of the way, we need to talk about your subject. You can’t get a gorgeous landscape photo without a gorgeous landscape. (Unless you’re a Photoshop whiz, but that’s another topic altogether).
Spend Some Time Scouting
Don’t expect to arrive at a location and get your shot within 15 minutes (although sometimes that can happen). This is especially true if you’re photographing a famous location. You’ll end up with the same tired old shot as everyone else.
Instead, give yourself plenty of time. If you’re aiming for a sunset shot, show up a couple of hours early. Walk around, take a few test shots, try out different angles. Do your preparation right and once the show begins, you’ll know exactly the position(s) you need to be to get that breathtaking image.
Pay Attention to the Weather
Weather patterns make a difference when photographing landscapes. Storm clouds can add a foreboding sense of drama to a scene that would otherwise be slightly boring on a day with a clear sky.
To that end, keep an eye on the weather report as you plan your shoots. If you’re photographing at a location near your house, don’t hesitate to come back at different times of the day and in different weather conditions to capture unique images.
Take a Hike
Going for a hike along the beautiful trail presents many opportunities for photographing beautiful landscapes. Overlooks are nice for their easy access, but many other photographers have already photographed the scene. Hiking offers opportunities for new angles and fresh perspectives that you won’t find at a drive-up location.
Get Out and Explore!
There’s a big world out there just begging to be photographed. Stunning landscapes abound on our beautiful planet and plenty of folks will appreciate your images.
Landscape photography involves a lot of waiting to get that perfect shot, but many people find it so relaxing. Would you love to spend an evening at the beach watching the sunset and waiting for the perfect moment to take a breathtaking photo? Take these tips with you and start experimenting to see what you come up with!
Click this link to view some of our picks for landscape photography lenses.


3 comments