This begins a series of articles on studio lighting that I put together with help from Karl Leopold at ImagesForever.net in Melbourne, Florida. Karl graciously opened his studio to me and patiently went through the basics of lighting a studio portrait.
Portrait lighting is one of those deceptive subjects where it’s easy to grasp the concept, but can take years to master the application. Yet when all the pieces come together it can be magic. Getting all the move parts of a great portrait to come together at the same time can be a little frustrating, but all the effort seems like nothing the first time you see a great portrait hanging on the wall and realize you shot that!
A great portrait is one that the subject and people who know them leave on the wall for decades, a shot that not only shows what a person looked like but defines them. But before the glory comes the tough march up the hill of learning.
Some elements of studio photography are surprisingly technical and to keep it from sounding like a university lecture, I’ll need to break up the topics a little. That’s a long-winded way of saying that I will be covering some of the less exciting subjects like light ratios, lighting styles and posing in later articles.
Today we can start with a basic 3 point lighting setup, the staple of a head and shoulders portrait. You can shoot portraits with any number of lights, we’ll eventually be getting up to five in this series, or none at all.
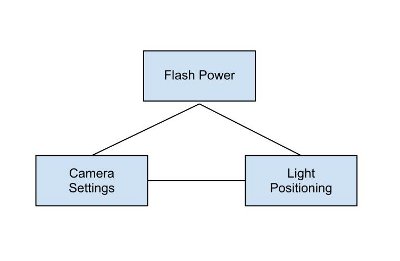
Studio lighting involves balancing three important factors:
- Flash power
- Light positioning
- Camera settings
We went with a fairly basic three point lighting setup which breaks out like this:
- Main or Key Light
- A fill light
- A hair light
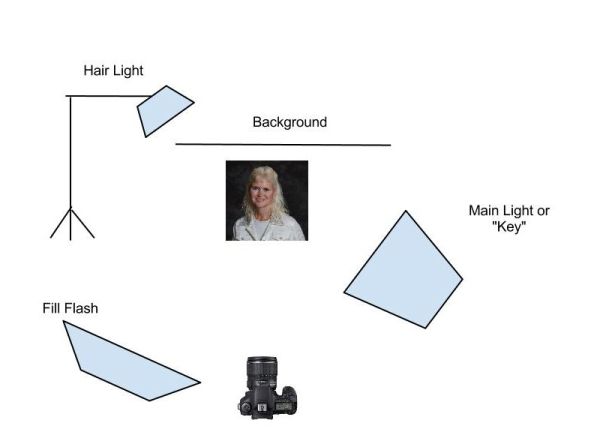
For a background we tried both patterned dark and white.
Settings and gear
For this setup we were using the following equipment:
- The key light was an Alien Bees 800 in a Fomex rectangular soft box
- Our fill was an Alien Bees 800 in a 48 inch Octodome
- The hair light was an Ultra 1800 with a grid screen on a boom
We used only one modeling light on the Fomex soft box and left the key and fill strobe power set at 3/4 power, except the hair light, which was set at the 1/4 power setting.
Because this is an instructional shoot, we went with some fairly basic settings.
Shutter speed: 125th of a second
F-Stop varied between f/11 and f/14
Lens was Canon 18-135 zoom set as close to 85mm as I could approximate on a Canon 7D
The lights are on PocketWizard Plus remotes and the trigger was a PocketWizard MiniTTL. I ran a standard color correction filter and cropped a few where the background was excessive, otherwise the images are unaltered.
Our settings were almost spot on straight out of gate. We had to make some exposure adjustments between the darker and lighter background when we started to get some blowback from the more reflective white background, but we basically shot the same settings through one set before changing the talent clothing and background.
First light
So you can see the difference each light makes, we started with the key only.
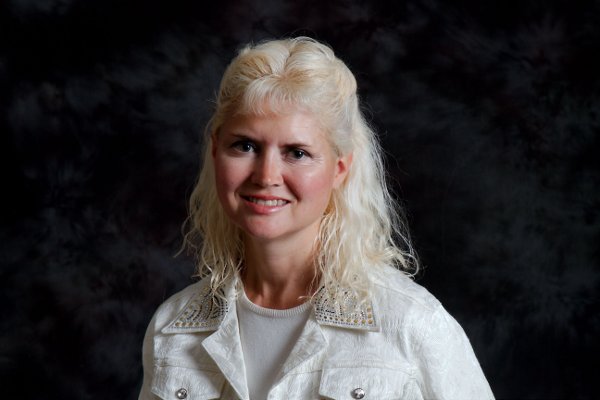
Notice the sharp shadows and the subject’s back shoulder does not stand in sharp relief to the background. The shadows under the chin are too deep and the whites in the jacket are muddy. This light source is far too harsh for a single light set.
Second light
Next we added a fill.
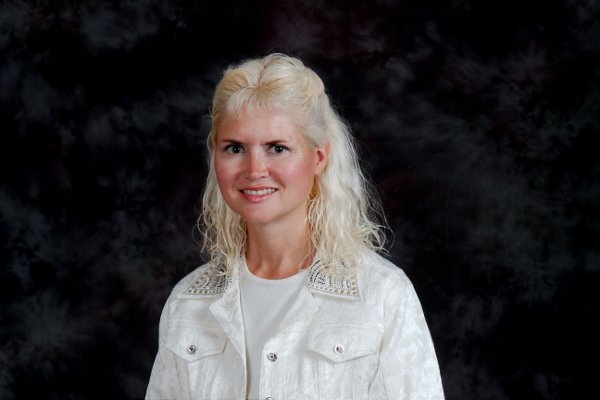
As you can see in the second photo, this lighting ratio still preserves some of the shadow and character of the subject’s face but the shadows are softer and less distinct. We have better fill under the chin and the jacket colors are more uniform.
If you notice on the drawing the fill light is set farther from the subject than the key. That is not an accident.
If the key and fill were exactly the same distance from the subject and set to the same power settings, the light would be flat and unattractive. You want to leave some of the shadows, but not as sharp as the ones with a key only.
You can do that one of two ways: You can cut the power of the fill and leave it at the same distance or you can leave the power settings alone and move the fill farther from the subject, which is what we did.
The relationship between the key and the fill is most often expressed as a ratio. If the key and fill are set to the same power at the same distance, the ratio is 1:1. If you cut the light from the fill by 1 stop, you get a 2:1 ratio. The ratio we used was 3:1, which means the fill is at -1.5 stops from the key.
More about that in future articles. We used a flash meter to make sure the fill distance was set properly.
Third light
Then we put it all together by turning on the hair light.
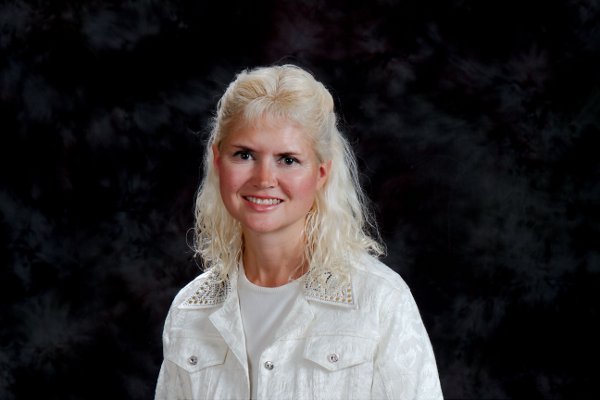
Take note of the halo effect around the hair and how the back shoulder is highlighted and isolated from the background. With a little cropping and some additional post-processing this would be an adequate head and shoulders shot, though it’s a little boring.
Next time we’ll add some more lights, change the background and see if we can raise our game and come out with a decent commercial quality portrait.


Thank you very much. I am just getting started, lighting is very important and its always good to talk to someone that has the experience like you. Thank you for the lighting tips