Filling deep shadows with artificial light has been a part of photo technique since the invention of flash powder in the 1880s. Synchronizing a handheld flash with ambient sunlight is a terrific way to soften shadows and create professional looking images. Synchro-sunlight or fill flash, two names by which it is often called, is used by many of the greatest street and travel photographers; press photographers using handheld cameras (watch those flashes go off at any press conference), and is a required skill for portrait, wedding, and fashion photographers.
 The concept is quite simple: use your flash to illuminate the subject and use sunlight to illuminate the background.
Once you learn how to use synchro-sunlight you can apply the same techniques to studio lighting.
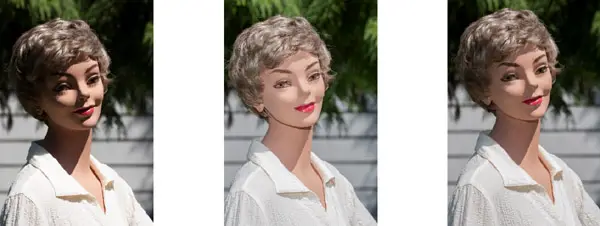
Figures 1 – 3. Shadows can be created either by light falling directly on the subject (front lit) or from behind (backlit). In this example the subject is front lit, as seen in figure 1. The dark shadows create drama, if that is what you want, but they are not often flattering to the subject. Figure 2 was made using full fill and figure 3 was made using partial fill. Photos by Steve Anchell.
There are two basic techniques to using synchro-sunlight, full fill and partial fill, figures 1—3. Both methods can be used with a front lit or backlit subject; with either a built-in camera flash, an on-camera flash attached to the camera’s hot shoe, or a flash held away from the camera via a flash cable or by using a remote trigger device.
Built-in camera flash is limited by both placement and power. However, it performs well for photos with one or two subjects and should not be overlooked when the light is too harsh and the shadows around the subject is deep.
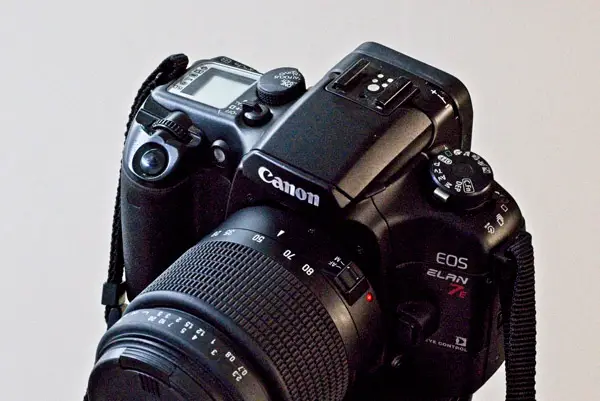
Figure 4. This camera has both a built-in flash and a hot shoe. What it lacks is a PC outlet to which an extension cable can be attached.
If your camera has a hot shoe you can mount a handheld flash on top which will enable you to photograph larger groups from further distances. You will also be able to use flash modifiers that will soften the light and disguise the edges of the shadow. The downside is that the light can only come from one direction—the camera.
A hot shoe will also allow you to use a transceiver, such as the Pocket Wizard, figure 5. This will allow more options for the direction of your fill light and the distance of your flash from the subject.
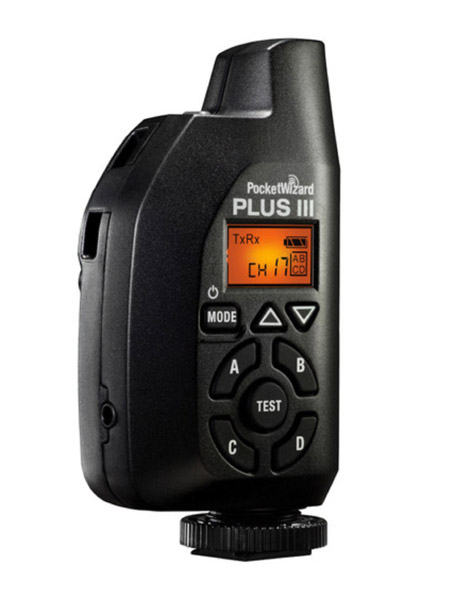
Figure 5. The Pocket Wizard remote transceiver will allow you to trigger your flash from any position or distance from the camera. This will allow you to control the direction of the shadows and the amount of light reaching your subject.
A PC outlet on your camera will allow you to use the far less expensive option of an extension cable to move your flash away from the centerline of the camera lens and control the direction of the light for more creative options, see the main image. If your camera doesn’t have a PC outlet you can purchase an adapter to use with the hot shoe, figure 6. Make certain your flash has a corresponding PC outlet to connect with.
In addition to a handheld flash you will need an exposure meter. You can use the meter built into your camera. Set the meter to Spot metering mode and use the lens to zoom into the areas you need to meter; or if you don’t have a zoom lens walk as close as you can and take the reading. This is not as convenient as using a handheld meter. You can download a Pocket Light Meter app on your smart phone; or you can purchase an inexpensive light meter such as the URCERI on Amazon; or a professional unit such as the Sekonic Speedmaster L-858D-U Light Meter. The advantage of the Sekonic meter is that it has a built-in spot metering function that allows you to meter both the background and the subject without leaving the camera position. With less expensive meters, like the URCERI or the smart phone app, you’ll find yourself walking back and forth between your camera position, your subject, and the background. Of course, this is a good way to rack up steps on your Fitbit.
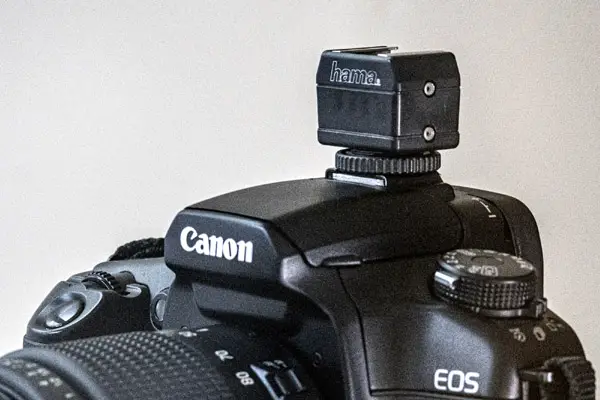
Figure 6. If your camera doesn’t have a PC adapter built-in, you can add one such as this inexpensive option by Hama.
4-step Synchro-sunlight
1. Set both your camera and flash on Manual.
2. Set your shutter speed to the highest setting that it will sync with the camera. This will vary depending on both the camera and flash unit used (refer to your camera manual). You can use alternative shutter speeds to over— and underexpose the background, but while you are learning keep it simple.
3. Take a meter reading of the background and set the recommended f/stop for the shutter speed you set on your camera in step 1, figure 7. This will correctly expose the background.
4. Move the flash to the distance shown on the flash control panel for the f/stop set in step 3. This will correctly expose the subject.
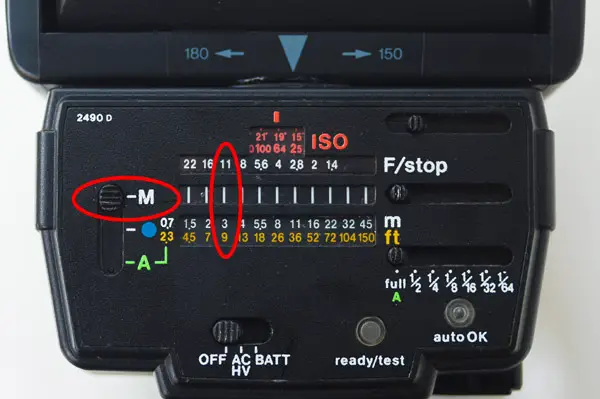
Figure 7. If the f/stop for properly exposing the background is f/11 move the flash 8 to 11 feet from the subject. If the fill is too strong then reduce the power of the flash as shown on the right of this Vivitar 285’s control panel.
NOTE: If you are using a built-in pop-up flash the sensor will automatically adjust the exposure. If the fill is too strong or weak follow the instructions below using the +/- flash power settings on your camera.
Adjusting the Amount of Fill
If the fill is too strong, figure 9, reduce the power of the flash using the control panel settings on the lower right side as shown in figure 7 (full, 1/2, 1/4, etc.). This is known as partial fill.

Figure 8 (on the left). This image of Mollie is backlit by the sun. Figure 9 (on the right). This image was made using full fill. By moving the flash further away or reducing the power on the Control Panel the image would be partially filled for a more natural look. Photos by Steve Anchell.
If the fill is not strong enough on full power, you will need to move the flash closer. If it is mounted on your camera then you will need to move the camera closer as well.
Don’t be daunted. It only takes a little practice to become an expert at using synchro-sunlight. Let me know if you have any questions.
Click on the following link to learn if you get the most out of your on camera flash.


1 comment